Really, truly understanding compressors

I have read and watched many, many explanations of compressors over the years and even made my own, but the thing I find lacking in most of these explanations (including mine!) is the why. Let’s try to fix that. Today I’m going to talk about not just what each of the controls do, but how each of them affect your sound and how best to use them as a content creator.

Threshold and ratio

Just to back up a bit, a compressor is a tool that controls the dynamic range of an audio signal, dynamic range being the difference between the loudest and quietest parts of the signal. It does this by reducing the level of the loudest parts of the signal, as determined by the threshold and ratio. These are the two most important controls, but also the easiest to understand. To put it simply, threshold controls which parts of your signal will be compressed and ratio controls how much compression is applied. A lower threshold means more of the signal will be affected while a higher ratio means it will be compressed more.

For example, if you set the threshold and ratio high (let’s call it a -10 dB threshold and a 5:1 ratio), then you will not be applying compression very often, but when you do, you will be applying a lot of it. In essence, this is what a limiter is. This could be useful if you don’t like the compressed “broadcast” sound or just generally don’t need to control the dynamic range much, but you still want to make sure that you don’t clip because of more extreme transients (the loud spikes at the beginning of sounds, especially words with hard consonants).

Waveform with no compression
No compression applied. Those big peaks are the transients, yikes!

Conversely, maybe you want to set the threshold and ratio lower, say -30 dB and 2:1. With this, you would be applying compression to most if not all of your signal, but you would be applying less of it. Because of how ratios work, though, you’d still be applying quite a bit to the loudest parts. As a quick bit of math, a peak at -5 dB would be reduced to -9 dB in the first example, but it would be reduced to -12.5 dB in the second example. This means that you can still control those sharp peaks, but you’ll also be evening out the rest of the signal for an overall more consistent level. Some people don’t like this compressed sound, though, as it is generally less natural sounding.

As a side note, some compressors have a compression control instead of a threshold control. These are functionally the same; turning up the compression simply lowers the threshold. The end result is the same, it’s just important to know which direction you need to turn the knob.

Attack

Attack controls how long it takes to reach full compression after the signal level exceeds the threshold. I’m going to reiterate that because I have had this wrong for many years: attack is how long it takes to reach full compression, but compression starts to kick in as soon as the threshold is crossed. Simple enough, but why would you want a short or long attack time? Generally speaking, a longer attack time will sound more natural. This is because a longer attack allows some of the initial transients through. On the human voice, for example, 5-15 ms is usually long enough to allow spikes from hard consonants to pass unaffected, which sounds more natural.

Waveform of compressed audio with slow attack time
Compressed with an 8 ms attack time. Now those transients are clipping!

However, because a longer attack time allows some transients through, it is less effective at preventing clipping. This is why most limiters have very fast attack times, sometimes under 1 ms. You might think that you should just always use a fast attack time, but such a setting does not usually sound very natural (and sometimes sounds downright bad) and can also introduce distortion, particularly when you are trying to apply a lot of compression. Some compressors will handle this better than others, so unfortunately, this is a control that you will just need to experiment with to find what works best for you.

Waveform of compressed audio with fast attack time
Compressed with a 0.05 ms attack time. Much better!

What if you want the best of both worlds? A very common trick is to use two compressors, one with a higher threshold and ratio and a very fast attack to catch just the high peaks and another with a slower attack and lower threshold and ratio to even out the rest of the signal. Elysia compressors also have an “Auto fast” setting that allows the attack to normally be set higher, but automatically speed up as needed.

It’s also worth mentioning that the attack time is further modified by both the type of compressor and the knee setting. I’ll discuss those more later, but just know that some compressors are capable of faster attack times than others while some have a smoother attack curve than others. This is why recording studios have traditionally had many different compressors on hand, though in the digital age, a single plugin is often capable of many kinds of compression.

Release

Release time is basically attack time in reverse: as soon as the signal level drops below the threshold, it will start returning to the normal, uncompressed level at a rate specified by the release time. Unlike attack, which does this on a more logarithmic curve, this is generally done in a linear fashion for release (though some compressors can also do it logarithmically).

In practical terms, the release time can control how natural or compressed the signal sounds, how much the sound “pumps,” and how much room reflections (“reverb”) you can hear. A very fast release time will technically result in an overall more even average signal level, but it will sound very uneven as the sound “pumps” up and down rapidly. Conversely, a very slow release produces a much more natural sound, but a less compressed sound overall. It works sort of like just turning the volume down generally rather than bothering with compression at all. The trick, then, is to find the balance between the two. You want to set it low if you want it to sound compressed or want a more consistent signal level, but if it’s too low, it may sound extremely unnatural and it can emphasize the ambient room reflections (which most creators do not want).

As with attack, you will need to experiment to find a sound that works for what you want to achieve. For my part, I have found 75-100 ms to be a good balance that avoids unwanted room reflections while also not sounding too compressed. However, like attack, release is also further modified by the type of compressor in use, with many analog compressors simply having fixed attack and release times.

Other controls

Knee, RMS, and compressor type/style

These controls are at least someone related, so I’m grouping them here. Knee is pretty straightforward. Think of it like adding a fade: normally, when you reach the attack time, the signal immediately cuts to the lower level; by softening/increasing the knee value, it becomes more of a fade from one level to the next. As you might imagine, this helps make for a more natural sound. Some compressors, especially digital ones, have controls for this, but many others simply have a fixed knee. It’s not something to worry about too much, but if you have a control for it, you might as well change it and see if you like it better.

The type or style of compressor, as mentioned earlier, can have a big affect on the overall sound of the compressor. These are typically named for their analog equivalents, so you might see names like optical, VCA, FET, or more descriptive terms like clean, classic, etc. These are all different technologies used in the analog world with varying consequences on the sound. An optical compressor, for example, uses an actual light and light sensor to determine the signal level, which means it reacts much slower to changes in level. They are often more natural and smooth sounding, but ill-suited for dealing with fast transients, making them a great choice for vocals (as long as you are mindful of the transients). FET compressors, on the other hand, use a field-effect transistor (FET) instead of light and are also typically feed-forward designs, meaning that they detect the signal level before compression is applied. This allows for much faster attack times, so they are very well suited for peak limiting. The legendary 1176 is a FET compressor, for example, and has often been used in combination with the LA-2A, an optical compressor, for vocals.

The RMS, or root mean squared, control on compressors like ReaComp is a handy way to approximate different styles of compressors. Essentially what RMS means is that the signal level is averaged over time when determining whether or not it is above the threshold. If set to 0, no averaging is done, so the compressor can react immediately to level changes. If set higher, the compressor will work more like an optical one, sounding smoother but reacting more slowly to level changes.

In general, I wouldn’t worry about these too much. If you are really curious, researching the different types of analog compressor would go a long way toward understanding what to expect out of each of these; otherwise, if they are options available to you, you might as well try them and see what you like.

Hold

Hold time is a delay before the release starts. With hold time set to 0 ms, the release time will start as soon as the signal goes under the threshold; if set higher, the signal will continue being compressed even after it goes under the threshold until the hold time ends. Only after the hold time has ended will the release begin, assuming the signal is still under the threshold. In general, there is not much reason to mess with this and most analog compressors don’t even have a hold control. As always, feel free to experiment, but this can generally be left at 0 ms and ignored.

Range/gain reduction limit

This control sets the maximum amount of gain reduction that can be applied. If you don’t want too much compression applied, you can limit it with this, but it many compressors do not even have this option.

Lookahead

As you might imagine, this allows the compressor to “look ahead” and see if the threshold will be exceeded before it has actually happens. Naturally, this adds latency equivalent to the amount of lookahead time, so you probably don’t want to use this when streaming. And for obvious reasons, it is only available with digital compressors.

Final thoughts

Over the years, compressors have become increasingly flexible and also offer a lot of visual feedback. Unfortunately, these added controls usually make them harder to use for newcomers. It’s easy to say, “Just play with the controls until it sounds right,” but without guidance about what to expect out of the controls, it’s hard to know where to begin. I hope that this guide has helped you understand not only what each control does, but also why you might adjust them.

Audio basics for streamers: a follow-up

It has been several years since I wrote my audio basics posts and published a series of videos on the subject and while they still have a lot of good information, I have also learned some things since then. Nothing that fundamentally changes anything I said previously, mind you; that’s all still good information. These are just some little tips and tricks I’ve picked up along the way that I thought I would share.

Mic choice matters

But probably not as much as you’ve been led to believe. You’ve probably heard, even from many intelligent audio producers, that dynamic mics are less sensitive than condenser mics (which is true) and that means they are better at background noise rejection. They are not. If you take two mics with vastly different sensitivities and match their output level, all sounds entering the front of the mic will have exactly the same output level. Sensitivity is not magic, it only measures the output voltage of the mic when presented with a given input level.

Notice I said the front of the mic, though. That’s because the relevant factor here is not the sensitivity but rather the polar pattern. Just because a mic is cardioid does not mean that it is the same as other cardioid mics. Cardioid is a very broad category, so let’s look at two examples.

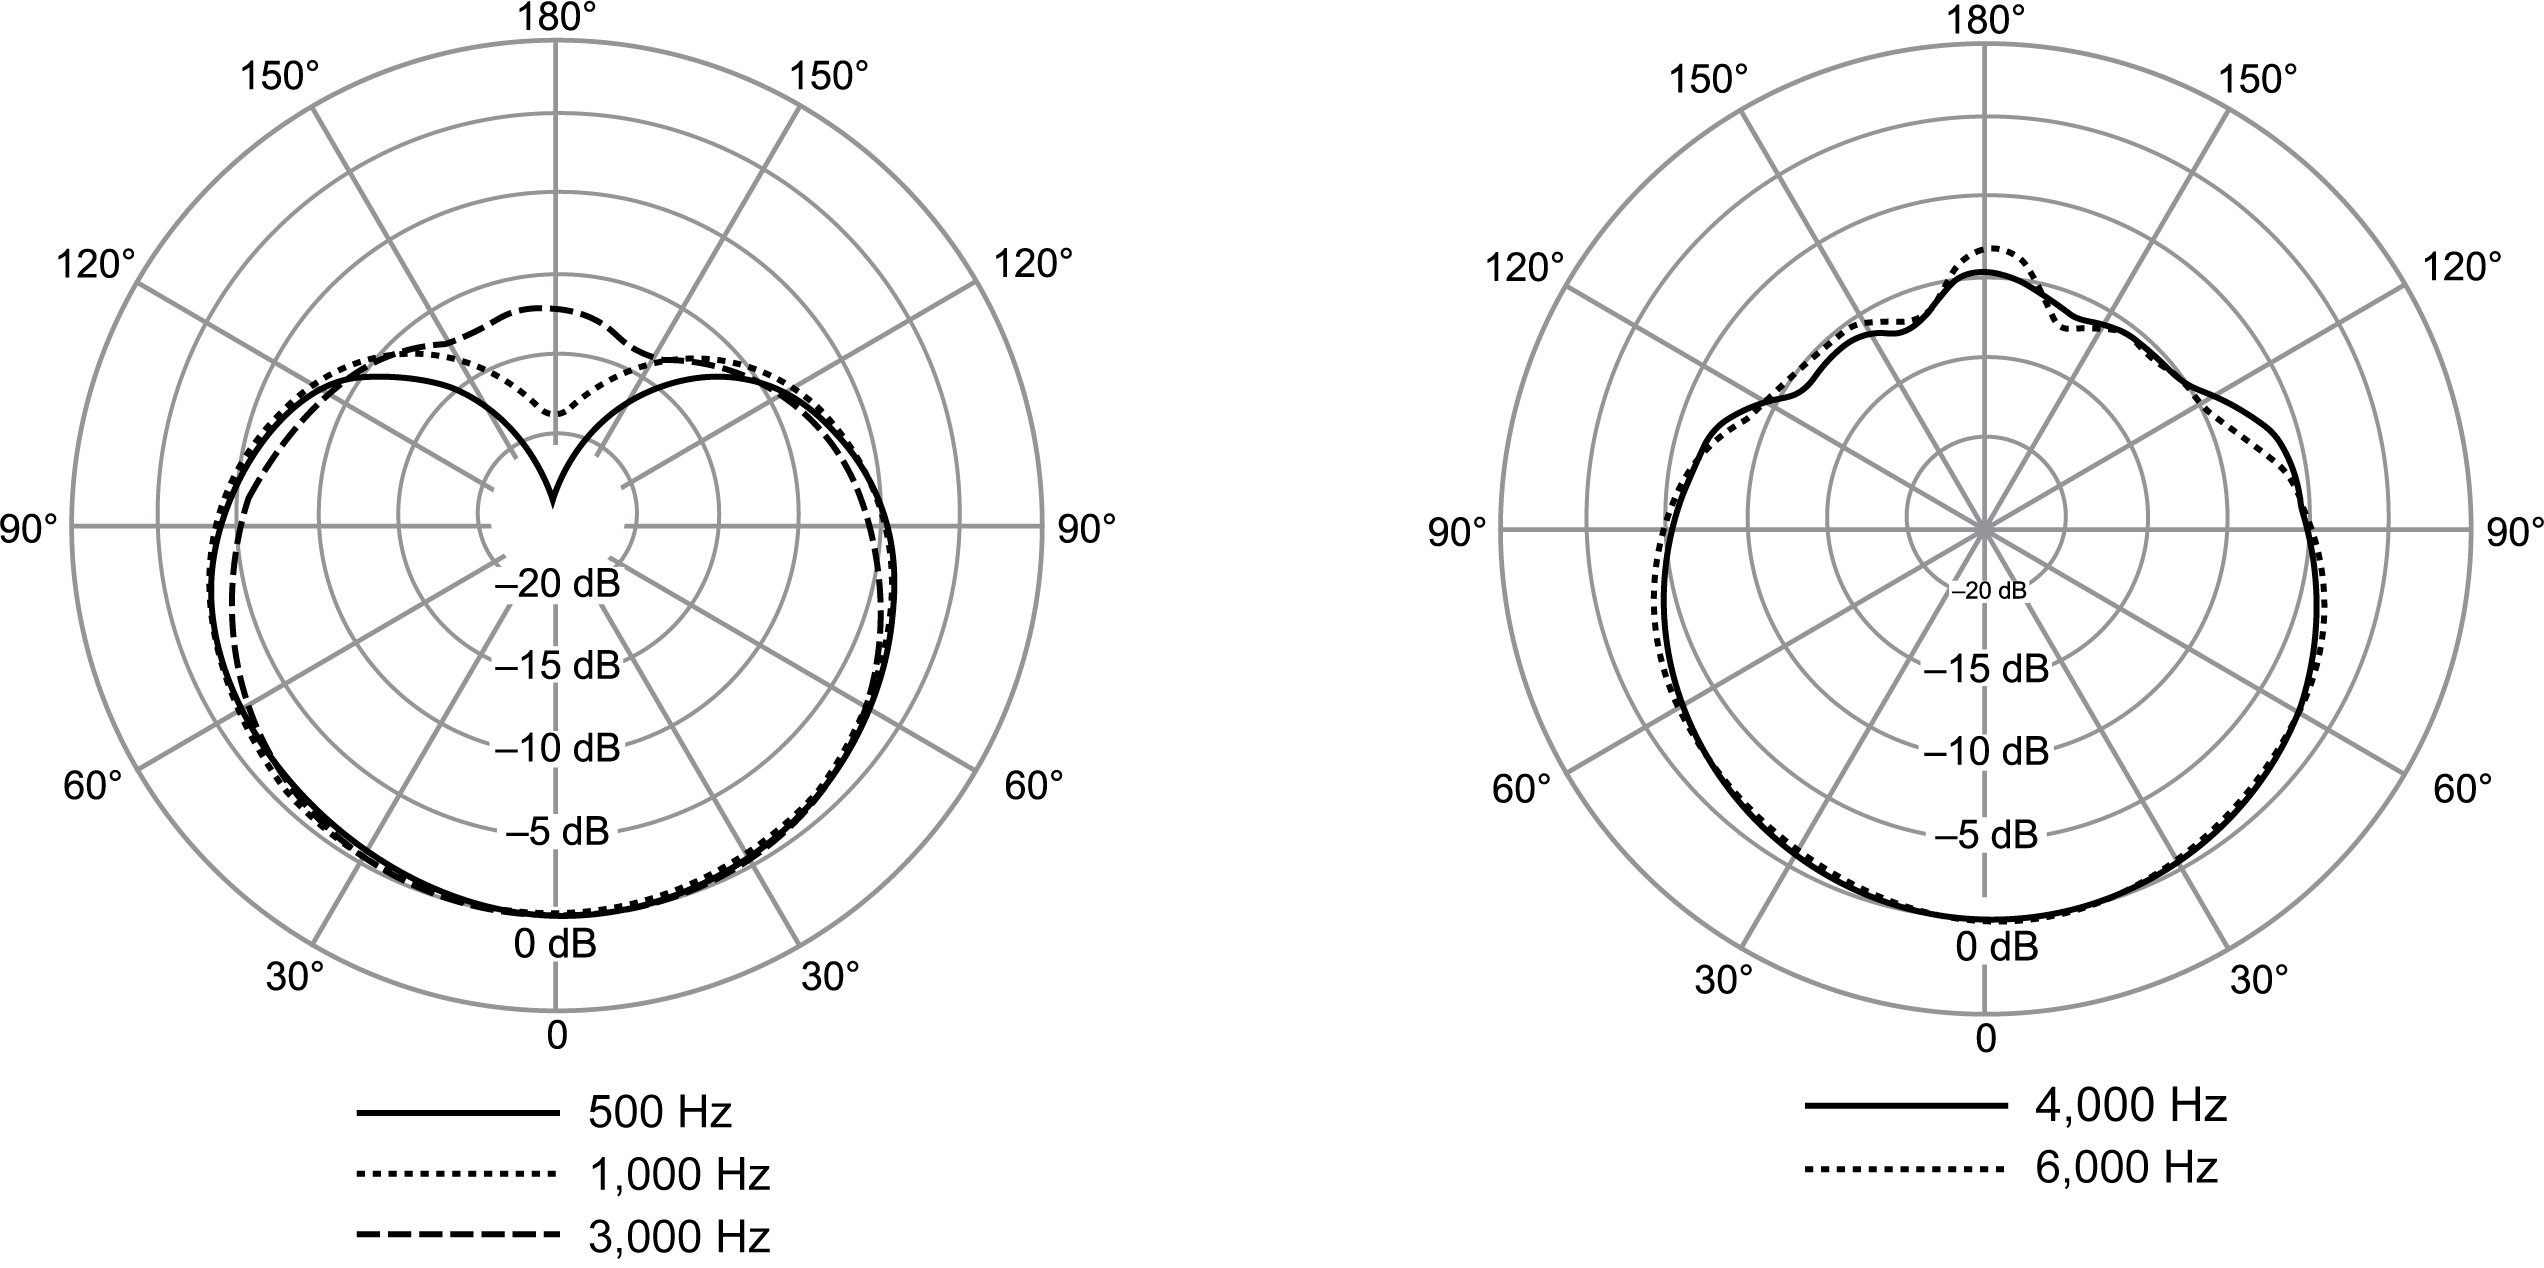
SM7B polar pattern graph

Here is the polar pattern graph for the SM7B. If the image doesn’t load for some reason, it was taken from the official user guide, available here. This is a cardioid polar pattern (that refers to the heart shape), but you’ll notice that as the frequency increases, the polar pattern tightens. That is, the mic becomes increasingly directional at higher frequencies. This is useful because room reflections tend to occur mostly in the higher frequencies, so this suggests that it is good at rejecting those reflections that enter the mic from the side.

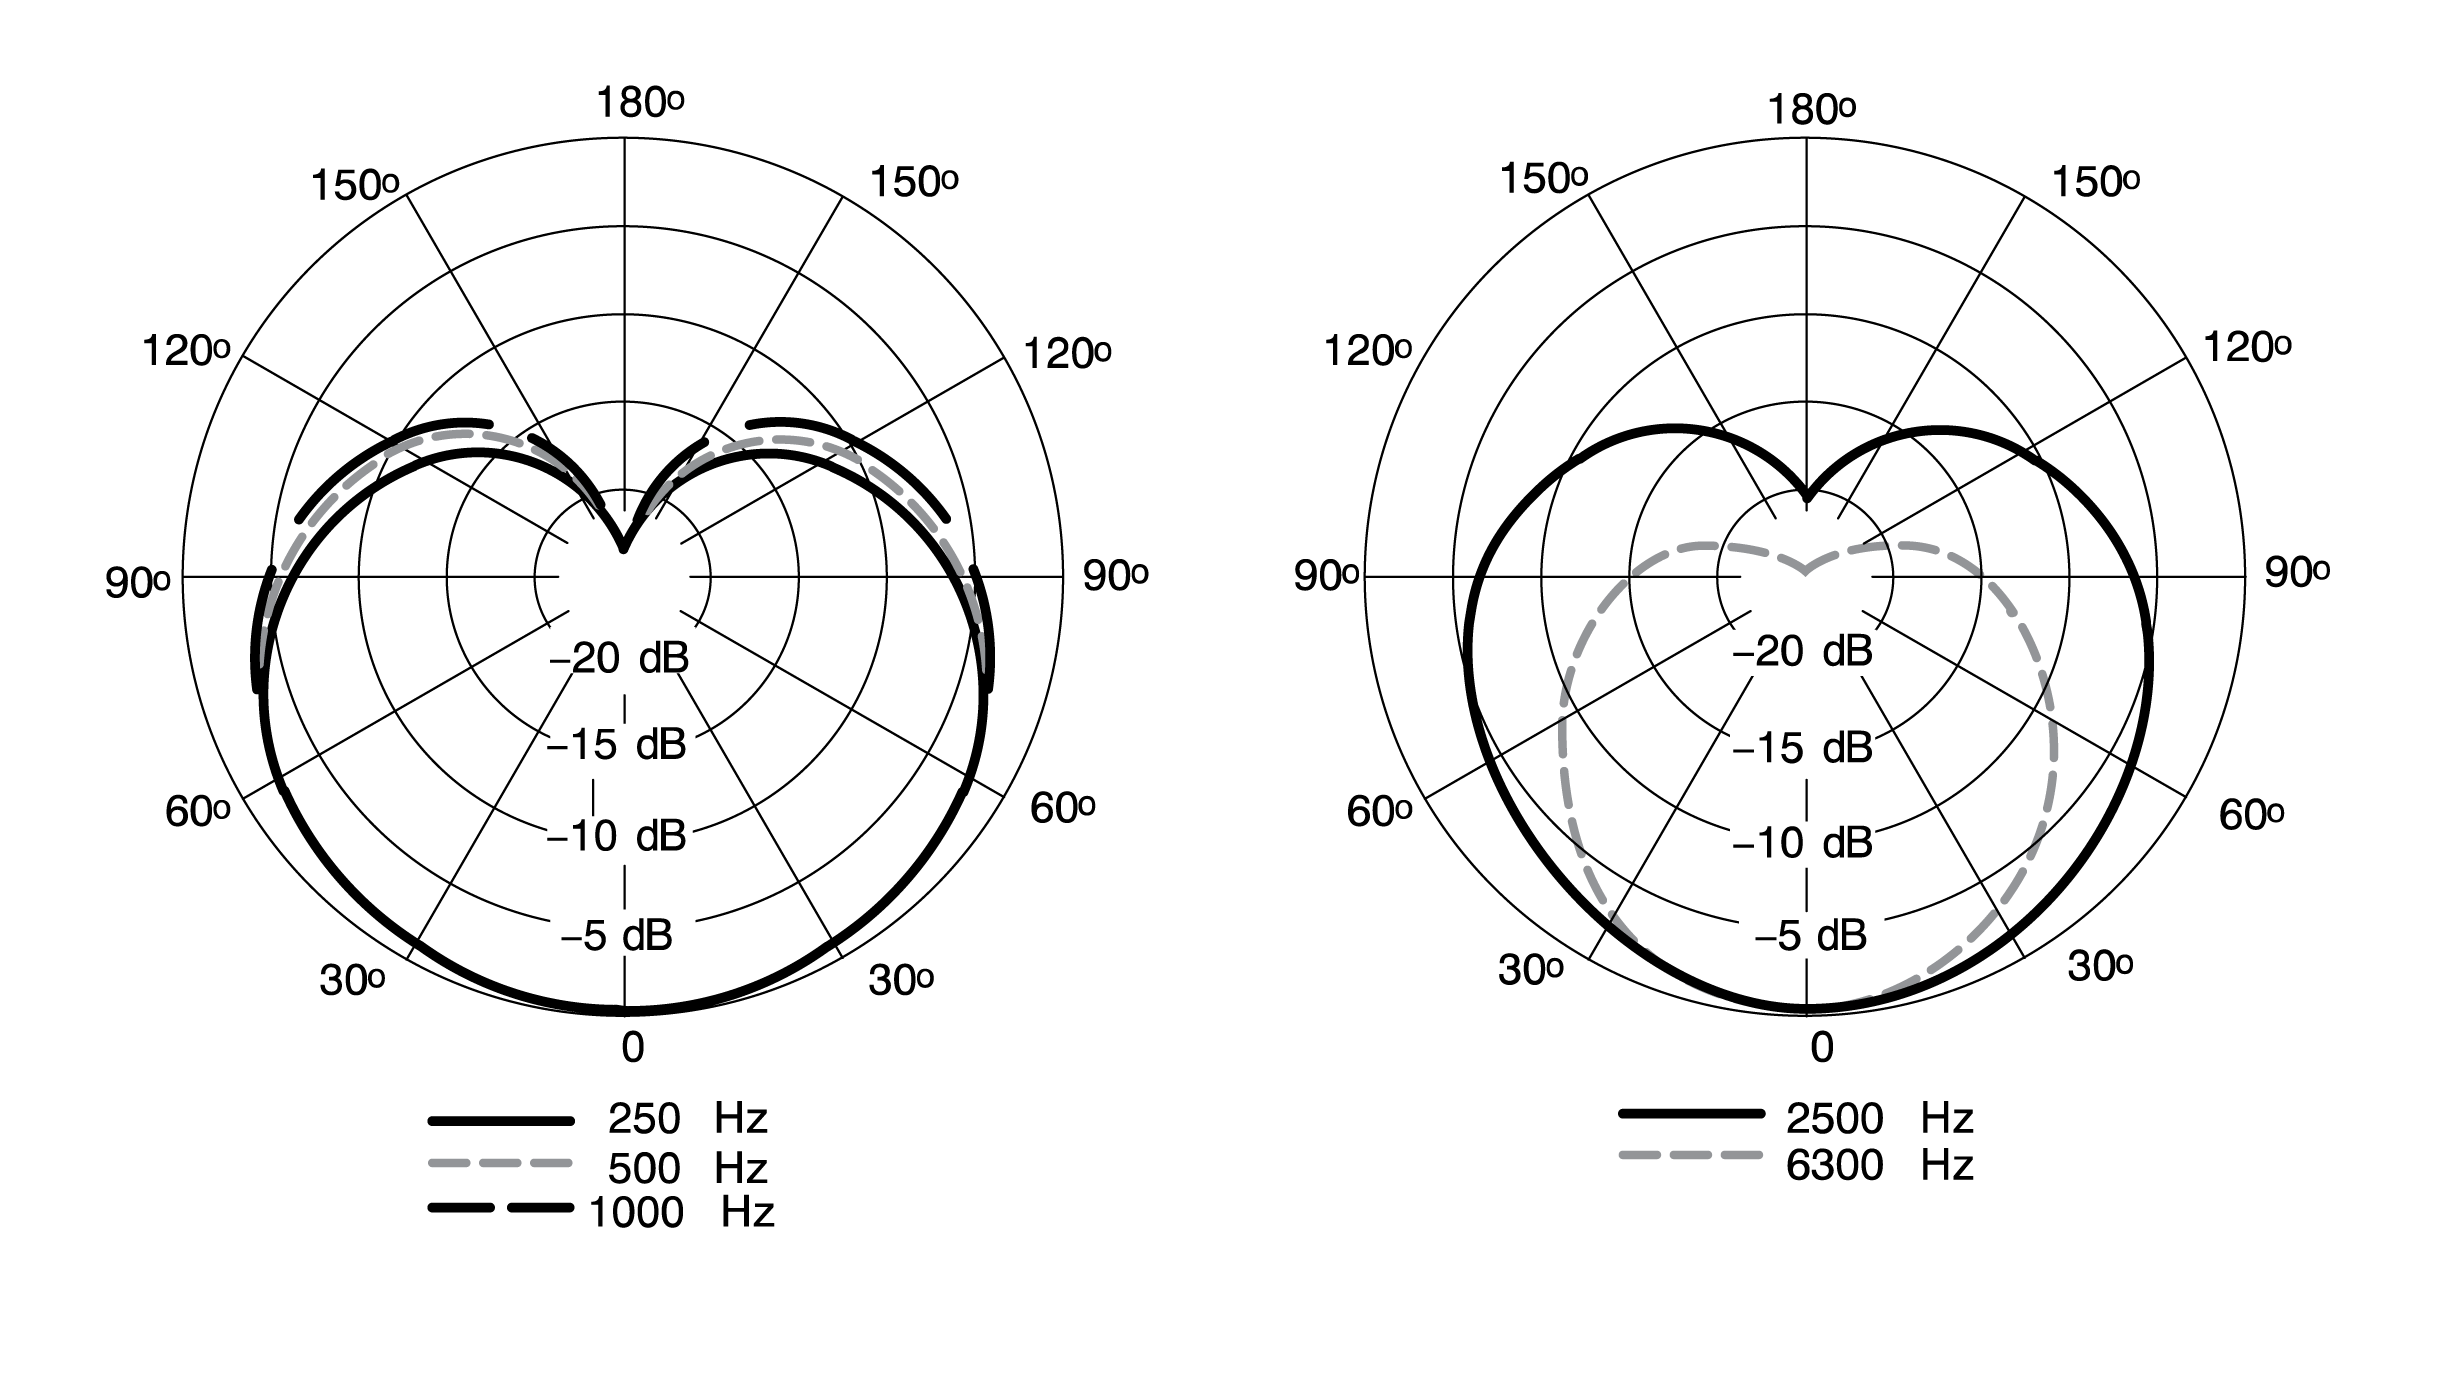
MV7+ polar pattern graph

This is the polar pattern graph for the Shure MV7+, also helpfully taken from Shure’s web site (thank you, Shure, for having useful and convenient specs). Unlike the SM7B, you’ll notice that the polar pattern does not narrow at higher frequencies. You’ll also notice that, like many other cardioid mics, it picks up a bit of sound behind the mic. This means that not only will it pick up more reflections from the sides but also from the rear. This is especially problematic if you position the mic in front of your monitor as it will pick up the reflections of your voice bouncing off your monitor.

Now, does this mean you should go out and buy an SM7B? Probably not. It just means that you may have more work to do when battling room reflections and that you will need to be cognizant of the polar pattern when positioning your mic. For example, don’t put the MV7+ directly in front of your monitor or have the back aimed at your keyboard if you don’t want people hearing that. You will also want to consider how the polar pattern interacts with any acoustic treatment in your room (or lack thereof).

Mic positioning matters

And not just regarding the polar pattern, as mentioned above. Mic position is something you will need to experiment to figure out what works best for you. One of the reasons people believe the SM7B magically removes background noise isn’t because it does but instead because it enforces good mic technique. It is designed in such a way that people want to be close to it. Not only that, but because it’s now a status symbol, people want to show it off, so they aren’t trying to hide it off camera. But you can do the same thing with any mic! Put it close to your mouth, 2-3″ away, and you’ll find that those room reflections start disappearing. This is because your voice is now significantly louder than those background sounds. The closer the mic is to your mouth, the better this signal-to-noise ratio (SNR) will be. Don’t be afraid to have your mic on camera!

The downside of bringing the mic that close is that it might get in your way and plosives might be more of a problem. In that case, experiment with moving the mic off to the side or down below your mouth (or both). Make sure you record some tests! As you move the mic around, you’ll find that the resulting tone changes. You may like the changes or you may not, so find a good position that balances SNR, tone, and plosive rejection.

Interface selection

There are honestly only a couple of things that really matter when it comes to an audio interface:

  • Are the preamps flat/neutral?
  • Do the preamps have a low noise floor?
  • Are the drivers reliable?
  • Is the headphone amp flat/neutral?
  • Does the headphone amp have a low noise floor?
  • What software features are included?

Most of those things are technical specifications that are pretty easy to look up, just be aware that many companies have misleading specs that really don’t tell the whole picture. Check independent reviews, especially once with technical measurements, to be sure. However, the software features can be very relevant for streamers. I don’t care much for onboard signal processing (DSP) or for a software mixer utility that has that since all of that can just be done in OBS, but many interfaces include software mixers with additional virtual outputs that can completely negate the need for utilities like VoiceMeeter. Audient (depending on the interface) and Elgato both have these features, but they are not alone. This is handy because it means I don’t need any additional software, they aren’t adding much (if any) latency, and there’s no quality loss. I like to use these to route my alerts and stream music to outputs 3-4 so I can hear them and they go to the stream, but they don’t go to my recordings. You could also use them to route voice chat to a separate channel for mixing. If your interface doesn’t have a virtual mixer, you can still use VoiceMeeter, so don’t feel like you need to buy something new, but if you’re in the market for a new interface anyway, you might want to look for this feature.

Gain staging and levels generally

I said in my previous post on setting levels that you want to set your preamp gain such that your loudest possible sound doesn’t clip and that is still true. What this actually means for you will depend on how dynamic you tend to be. If your voice doesn’t vary much in volume, you can set the gain higher and your post-processing workflow will be a bit easier; if, like me, you are all over the place, you’ll have to set your gain lower and do more work to level it out later.

However, when you are checking your levels to make sure they don’t clip, there is an important quirk of OBS that you will need to know. I won’t get too technical here, but the short version is that when you downmix to mono (which you should), OBS will compensate by lowering the level by 6 dB. This is to account for the increase in level that would occur if the same signal was on both the left and right channels, but for most of us using a mono mic, there is no signal on the other channel. The end result is that the mic’s output level is 6 dB lower than it should be and will never appear to clip in OBS even when it is clipping at the mic preamp stage. So when you set up your mic in OBS, in the advanced audio properties, set the balance all the way left (assuming you are on the “left” input), check the mono checkbox, and then go to the filters and add a gain filter with a 6 dB boost. All other processing will happen after this boost. Now you will see correct levels in OBS and can accurately gauge whether or not you are clipping.

Compression: sometimes more is less

As I mentioned above, I have a very dynamic voice. Most of the time, my input level is around -20 dB (or lower), but if I get particularly excited, I will hit all the way up to -0.5 dB. As a result, maintaining a consistent output level without sounding overly compressed has been a bit of a challenge. If you find yourself in the same boat, let me introduce you to the concept of… just adding more compression. Sort of. Sometimes.

One way to deal with the problem is to just crank up your compressor, but this tends to result in an unnatural sound that affects the entire signal. You may also find that no matter how much compression you add, you really can’t tame those extreme peaks. The solution is to just use two compressors, one to tame the extreme peaks and the second for general compression (and technically a third that is a limiter, just in case). As with all things, the following settings are just guidelines; you will need to adjust them for your own situation.

The first compressor comes after the 6 dB boost, noise gate, and EQ, and is intended to tame the highest peaks. In my case, I set the threshold to -17 dB, the ratio to an aggressive 10:1, and the attack as fast as it will get (0.005 ms for the compressor I’m using). There is no makeup gain on this compressor. The threshold was set so that my normal speaking does not hit this compressor at all, only the parts where I am yelling are affected. Having a fast attack means that the spikes from hard consonants can’t get through and the 10:1 ratio means that these very loud sections get squashed down to be more in line with my average signal level.

Now that the extreme peaks are tamed, I run the signal through a second, far milder compressor. This one is set with a -36 dB threshold so that nearly everything is affected, a mild 3:1 ratio, and an attack of 8 ms to intentionally allow hard consonants to go through as that sounds more natural (this is a trick I only learned recently). I then boost the signal by 19 dB to bring it up to a reasonable listening level (in OBS, this is toward the upper end of the yellow meter segment).

Finally, the signal goes through a hard limiter set to a -1 dB limit so that if all of that compression is somehow not enough, the signal still cannot exceed -1 dB (the recommended ceiling for most digital content). This probably sounds like a lot of compression, but keep in mind that most of the time only the second compressor is engaged. The end result is a very even output level that still sounds fairly natural.

That’s it!

Hopefully these are some useful new tips for you. Like I said, nothing about the original posts or videos has changed, but I have found these to be helpful tips to consider as I navigate my own streaming journey.

I was wrong about the SM7B… sort of

I have always said that you don’t need to buy an expensive mic to sound good on stream and I still stand by that, but for a long time, I really didn’t think the SM7B was particularly special. I thought it was mostly hype, bragging rights, and really more about the look than actually being a good choice for streaming. It’s big, it’s expensive, it requires a lot of gain, and it just doesn’t sound great without tweaking… or so I thought.

Why get one?

I have used (and still own) many different mics, but the one that I settled on as my streaming mic is the Neat Worker Bee (the original model). I like this mic because it’s cheap, it sounds great, and I like how it looks. For my voice in particular, I can use this mic without any EQ applied and it sounds almost exactly how I want it to sound. The first few videos in my Minecraft series use this mic and I was using it for streams, but I ran into a few issues that got me thinking about an upgrade:

  • My entire house has hardwood floors and effectively no insulation, so sound bounces around a lot. Even with 12 Elgato Wave panels on the walls, there’s audible room reverb, especially with the door open so the sound can escape into the hall and other rooms.
  • When I’m streaming Phasmophobia and playing with my wife, whose office is next to mine, even with a noise gate the mic will pick her up.
  • My mouse, which I like a lot and don’t want to swap out, has fairly loud clicks that the mic picks up. I waste a lot of time trying to edit them out of videos.
  • This probably seems stupid, but the Worker Bee’s capsule is recessed compared to the body and when in the shock mount, it is set back even farther. This means that my chest is constantly bumping into the shock mount just trying to get close enough to the capsule to sound good.

Given how much I like the sound of the Worker Bee, I was really loathe to buy anything else only to have it sound worse (as many other mics have). But the SM7B would seem to solve all of my issues, according to internet legend, so I started doing some research. I don’t think it makes a lot of sense to buy things I don’t need, so I wanted to be sure. Before taking the dive, I pulled out my trusty SM57 because, as it happens, it is easy to EQ an SM57 or SM58 to sound “close enough” to an SM7B. I learned that it sounds nothing like the MV7, which I had previously purchased thinking it would be a cheaper SM7B, and really nothing like I thought it would generally. This also taught me that while I can EQ those mics to sound like an SM7B, without EQ, the SM57 is far too bright for my taste. Knowledge acquired, I decided to give it a try. Here’s what I learned.

Findings

First, a lot of people describe the SM7B as sounding terrible without processing, but I don’t find that to be true at all. I guess I just like mics with a flat frequency response. It is, unsurprisingly, not as bright as the Worker Bee (which is a condenser with a slightly boosted top end), but a slight 2 dB high shelf boost at 3.5 kHz makes it sound quite nice. What did surprise me is that I also wound up boosting the low end just a little bit (about 1 dB). I assumed it would be overly boomy or muddy, but it really isn’t. Sure, I can still get right up on it to make it boomy, but at a normal distance, it’s quite flat. It may not get you the exaggerated broadcast sound you’ve come to believe is desirable right out of the box, but it’s a great starting point for crafting your own sound.

Second, if you read around the internet, you will discover that the SM7B is somehow magic at completely rejecting all room reverb and that this is due to it being a dynamic mic with extremely low sensitivity. It is a dynamic mic, but it is neither magic nor does that (or its sensitivity) have anything to do with it. Dynamic mics generally have thicker diaphragms, which means that they move less in reaction to sound waves, which means they output less signal and have lower sensitivity, but all this means in practice is that they require more amplification. It also (generally) means that they are worse at picking up high frequencies. And yet the SM7B is, seemingly, good at rejecting room reverb. Why? I suspect it has to do with the polar pattern and, in particular, the way the polar pattern changes depending on the frequency (you can view the graphs on this page). The higher the frequency, the more directional the mic is, becoming essentially hypercardioid at frequencies above 6 kHz. Most of what you hear from “room reverb” is in the higher frequencies, so when you have a mic that is both less sensitive to higher frequencies and that rejects a lot of off-axis high frequencies, you get less reverb. In contrast, the Worker Bee has a very wide cardioid pattern at all frequencies, hence why I struggled with it. However, it’s big brother the King Bee has a polar pattern very similar to the SM7B, as do plenty of other, cheaper mics. Interestingly, the SM57 and SM58 do not have narrowing polar patterns like the SM7B, so they may be more susceptible to picking up room reverb.

There is also a cost to this in the form of off-axis coloration. With the Worker Bee, I can angle it 45 degrees off the corner of my mouth to deal with plosives while still getting great sound; with the SM7B, if I do this, there is a noticeable (to me) change in tone. The more I angle the mic, the duller and muddier it becomes (though the change is subtle). This is not necessarily a problem as you may prefer that tone, but it’s something to be aware of when positioning this (or any similar) mic. In my case, I find that keeping the mic in front of me but angled up at my mouth provides the best sound.

Third, yes, it is a low-output mic, but most audio interfaces these days have preamps with enough gain to handle it just fine. Unless you have particularly noisy preamps, you are unlikely to need any sort of booster. I do have a FetHead (originally purchased to solve a noise issue with the Revelator io44) and I did end up using it as the EVO 8 interface I use has a bit of noise at high gain. It’s unlikely to be an issue in a streaming setting, but I had the FetHead, so why not?

Finally, and least importantly (probably), is the form factor. As I mentioned, the Worker Bee’s shock mount was constantly bumping into my chest. I could’ve moved it up and angled it differently, but then it would be in the way of my monitor. The SM7B attaches to the mic arm with a yoke in the center of the body, with the capsule sticking out a few inches from there. That allows me to keep the boom arm and the mic body out of my way while still getting the capsule close to my mouth. It needs to be said that an SM57 would accomplish the same thing, but I already knew I didn’t like the tone of that mic.

Final thoughts and recommendations

Before you ask, yes, I am keeping the mic. But should you get one? Probably not, at least not right away. I am a firm believer that you shouldn’t invest a lot of money (and this mic is a lot of money) in your stream until you are certain you want to keep doing it. You should wait until you have enough income from the stream to pay for the mic and then, if you still want it, go ahead and buy it. There are plenty of cheaper ways to get good audio, as covered in other posts here, in my videos, and in plenty of other videos. And yes, I realize I’m being a hypocrite, but I have a full-time job that pays me well, so I can afford it. But it is a good mic and just applying EQ to a cheap mic will not magically turn it into an SM7B. There are many factors that contribute to its legendary status and I now understand why it is a worthwhile purchase.

Why Xbox controllers are bad and how Microsoft can fix it

I originally posted this on Reddit almost a year ago, but, since then Microsoft has released the Series X/S with a new(ish) controller that has the same problem, so I figured it would be worth posting it here for some additional visibility. Maybe one day someone at Microsoft will see it and actually want to fix their controllers!

Let me start this post by saying that I do not want this post to start any sort of flame war. I don’t hate the Xbox or frankly have any real preference for any console. However, like many people, I was disappointed to find that the A button on my Elite Series 2 controller (which I otherwise love) could be unresponsive when pressed in certain ways. I wanted to find out why to see if there is anything I can do about it. The TL;DR version is that I don’t think there’s anything I can do about it, but there is something Microsoft could do to fix it.

So what is the problem? I first noticed it on my Elite 2. To put it simply, sometimes when I press the A button, it doesn’t register the press. On further examination, I discovered that it seems to depend on where I press the button; for example, if I press the bottom left of the button, it’s possible for the button to feel and sound as if it has been pressed, but no press is registered. That Elite 2 was replaced, but the replacement had the same issue, as did two additional ones I tried just recently. As it turns out, all my Xbox One controllers have the same problem, I just never noticed it before. The severity and specific angles are someone different from one controller to the next, but nevertheless, the problem is there. The easiest way to check for this yourself is to open the Xbox Accessories app on your Xbox, go to the button test option, press down with normal pressure, and wiggle the button back and forth while continuing to press down. You’ll see that at certain points, the button stops registering.

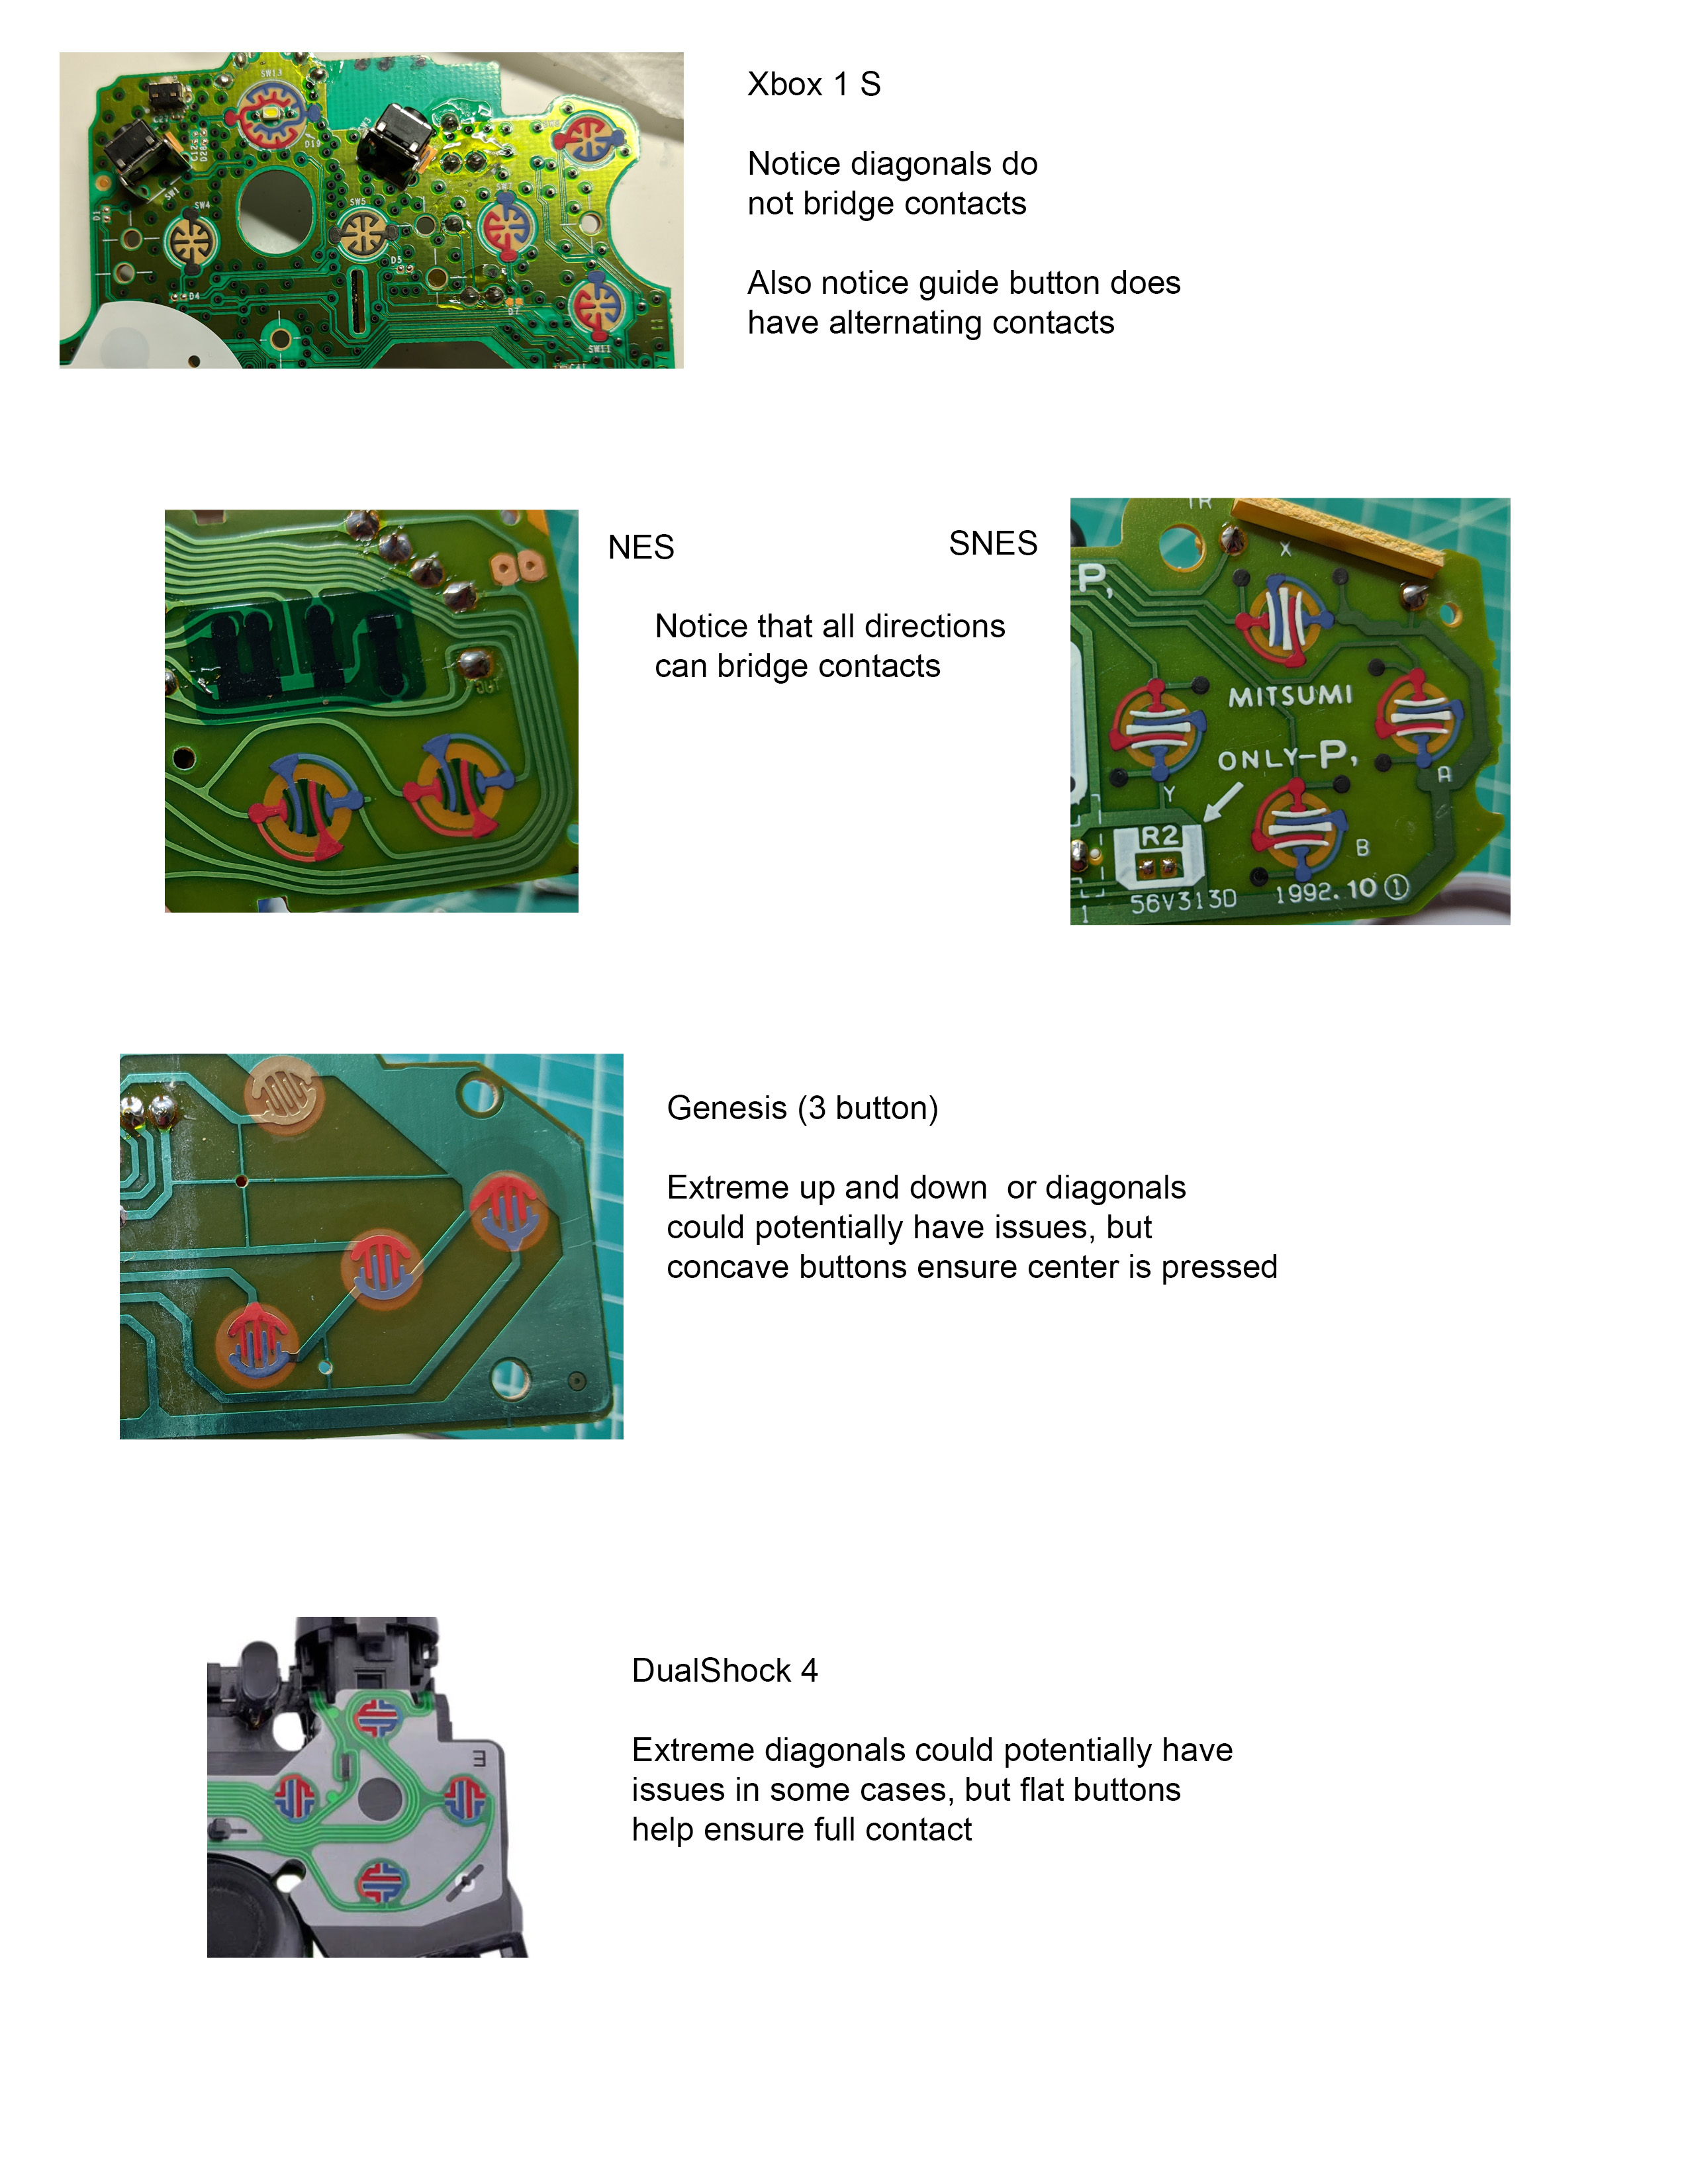
Why does this happen and, more importantly, why doesn’t it happen with non-Xbox controllers? Well, take a look at the diagram I put together. Except for the DualShock 4, these are all pictures I took myself using my own controllers. I compared the internals of the Xbox One S controller with the NES, SNES, Genesis, and PS4 controllers to get a better idea. If you don’t already know how face buttons (specifically those with rubber domes) work, the idea is that there are two contact points (which I colored red and blue in the image) on the PCB of the controller and a conductive disc on the underside of the rubber under the button. When the button is pressed, this disc bridges the two contact points and a button press is registered. It’s a pretty simple idea that has worked well for decades. What stands out to me is that the Xbox One controller is the only one where the contacts on the PCB do not alternate. That is, there is a clear gap down the middle between the two contact points.

Contact pad comparisons

In practice, what this means is that if the contact disc pressed down at an angle such that the full disc does not make contact, then it is possible to only press one set of contacts rather than bridging them together, resulting in… nothing. Pressing the button straight down works fine, as does pressing down with excessive pressure to force the full disc to contact, but certain diagonals (in the case of Xbox controllers) could be unresponsive. In particular, note that the specific diagonals the A button has trouble with are exactly where there is only one contact point.

Contrast this with, say, the NES or SNES controllers. The contact points alternate and curve out toward the corners so that no matter where you press the button, you are always able to bridge the contacts. The other thing I find interesting is that looking at the Genesis and PS4 designs, it looks like there could be points where the same unresponsive behavior could occur, but in practice it just doesn’t. I suspect this has to do with the design of the buttons themselves and the fact that these areas are much smaller than on the Xbox controller. In the case of the Genesis, the buttons are concave, meaning that your thumb will naturally press the center of the button every time. In the case of the PS4, the buttons are flat, but the areas where there is only one contact point are relatively small, so, in practice, you cannot press the button at such an angle such that you don’t bridge the contact points. On the other hand, Xbox controllers use convex buttons and have large areas where there is only one contact point, so it’s pretty easy to push the button to one side while pressing down, resulting in partial contact.

Unfortunately, since this is a problem at the circuit level, I don’t think there’s much an end user can do about it. If someone was feeling really adventurous and wanted to scrape away the current contact points and use some sort of conductive ink or something to redraw them, I suppose it’s theoretically possible to fix the issue. Ultimately, though, I really think it’s something Microsoft will need to address but, given that they had the opportunity to do so when redesigning the controller for the Series X/S and didn’t, I kinda doubt they are going to. I’d love to know why Microsoft decided to ignore decades of controller design here to create something objectively inferior, but the main thing is I’d just like them to fix it. All it would take, in my opinion, is a slight alteration to those contact points. Then it would be the perfect controller.

Razer Wolverine Tournament vs Ultimate: what’s different?

With the global pandemic keeping me at home, I’ve had a lot more time to play video games. After getting tired of Microsoft’s consistent failures with Elite controllers, I decided to venture out to the scary world of third party controllers and have fallen in love with the Razer Wolverine Tournament Edition. I also recently picked up the Ultimate Edition thinking that perhaps I would love it even more (I don’t, actually), but now that I’ve had a chance to compare the two, I wanted to talk about what the differences are. Some of them are pretty obvious, but others you’d never know about until you get them in your hands because no one, including Razer, seems to talk about them. Note that my goal is not to tell you which one you should buy, just to help you make an informed choice. So let’s dive in and talk about these two controllers one component at a time.

Body

The bodies of the controllers are virtually identical. The major difference here is that the paddles are placed differently (which I’ll talk about later) and that there are a few extra buttons on the Ultimate for profiles, button remapping, and headset mute and volume. In your hands, however, they might as well be the same controller, so if you like the feel of one, you will like the feel of the other.

Triggers and bumpers

Okay, that’s two components, but these are also virtually identical between the two models. The Ultimate uses a different finish, but it’s not real metal. Otherwise, the feel of actually pressing the bumpers or pulling the triggers is the same. The trigger stops are also identical. On a personal note, I absolutely love the trigger stops on these. Whereas the Elite Series 2 has a very solid, very hard trigger stop, these have just a little give to them, so they feel more like pressing a button them punching a wall. With the Elite Series 2, the trigger stops almost hurt; with these, I’m never not using them.

Misc. buttons

By which I mean the guide, options, and view buttons (I think that’s what they are called). They are the same on both controllers. Completely unremarkable, but I’m including them here for posterity.

Thumbsticks

Here is where the differences start. On the Tournament, you have plastic thumbsticks and they can’t (easily) be changed; on the Ultimate, you get magnetized metal thumbsticks. The tops of the thumbsticks use the same sort of rubber, so they feel pretty similar to use, but you have a convex and a longer concave option with the Ultimate. I find the rubber to be a little on the slippery side, but still very usable. What’s interesting to me is that after using the Elite Series 2, which has the most buttery smooth sticks I have every used, I expected the Ultimate’s sticks to be noticeably smoother than the Tournament’s sticks. But they aren’t. This leads me to conclude that any lack of smoothness has more to do with an unevenness in Razer’s anti-friction rings than anything to do with the thumbsticks. Ultimately (har har), the reason to get the Ultimate is for the options, not for the feel, as they feel mostly the same in use.

As a side note, the shafts of the thumbsticks are wider than your average controller’s sticks for some reason. From what I understand, this was an intentional decision and you still get full range with the sticks, but it does mean that it’s not so simple to open up the controller and swap in a different pair of sticks.

D-pad(s)

On the Tournament Edition, you get one d-pad; on the Ultimate, you get to choose between two. Sounds like it ought to be a clear victory for the Ultimate, but for whatever reason, Razer opted for three completely different designs here. The Tournament’s d-pad is basically a smaller, clicky version of the PlayStation’s separated d-pad. It’s technically one piece of plastic underneath (preventing you from, say, pressing left and right at the same time, a big no-no in most pro use cases), but it functions like four separate buttons. The buttons have a very low profile, so rolling your thumb from one button to another feels great. It’s almost like having a disc-type d-pad, but… not. I find that I have to be a little more deliberate when going for diagonals than I would with a PlayStation d-pad, but overall it’s an excellent design and I rather like it.

On the Ultimate, you get a fully separated d-pad and a disc d-pad. Unlike on the Tournament, the separated d-pad actually uses four separate buttons. It seems to be aimed at the FPS and RPG crowd – people who just use the d-pad to select items and the like. The buttons look kind of odd in pictures, but in practice their shape makes it very easy to hit diagonals and roll between buttons. However, the buttons are much taller than the ones on the Tournament. That’s not likely to be a problem for most people, I think, but it was a less pleasant experience for me than the Tournament’s approach. Also note that while the fully separated design allows you to press opposing directions simultaneously, both controllers are smart enough to know you shouldn’t be allowed to do that and are programmed to only accept one at a time.

The other option is a disc d-pad. It’s one piece of plastic with four openings to push down on the tactile buttons below. This is aimed squarely at fighting game players as it is the easiest way to do circle inputs or really anything involving diagonals. At first, I thought this d-pad was kind of mushy, but it seemed to somewhat vary depending on how I rotated it before putting it in. After a while, I actually came to rather like it. It’s a little easier to press than either of the other d-pads and diagonals are super easy to hit.

Face buttons

If all you read are the Razer product descriptions and the reviews on various blogs, you’d never know these controllers have different buttons. But they do. The first and only time I heard about that was a random YouTube video that showed up on my feed one day. They both use the same Omron mechanical switches found in Razer’s mice, but otherwise the feel is totally different.

On the Tournament, it feels like there must be a spring or something similar under each button. They are a bit stiffer to press than standard Xbox One controller buttons and there’s a fair amount of travel before the actuation point is reached. The actual actuation does feel just like a Razer mouse button, though. To me, these feel more similar to standard buttons, but the stiffness makes button mashing a bit harder. On a normal button, you’d feel the press almost immediately even though there is travel distance just due to the nature of the membrane, but on the Tournament, you won’t feel the click (or actuate the button) until most of the way through the press. It’s a bit odd sometimes.

Conversely, the Ultimate has extremely low profile buttons with almost no travel distance at all. They need only the lightest touch to actuate and feel exactly like using a mouse (albeit with your thumb). These are a little odd to get used to, but they make pressing multiple buttons at once (with the same thumb) and button mashing incredibly easy.

Truthfully, I wish they had gone for something in between the two: a slightly less stiff button with slightly less travel distance than the Tournament but not quite as light or low profile as the Ultimate. Your mileage may vary, of course.

Programmable buttons

Both controllers have paddles and extra shoulder buttons (a Razer exclusive). The extra shoulder buttons (M1 and M2) are identical on the two controllers; they are nice and clicky and, at least for someone with large hands, convenient and easy to use. With some practice, you could probably even use both a trigger and M1 or M2 at the same time with the same finger to, say, pull out your weapon and engage focus mode for more precise control. I didn’t have a lot of luck with that, but with practice I could probably adapt.

The paddles, on the other hand, are completely different. On the Tournament, you only get two paddles. They are conveniently located where the handles join with the body of the controller and can easily be pressed with either my middle or ring fingers. I have yet to accidentally press one, but they are always right there when I want them. On the Ultimate, you get four paddles, but they are in the middle of the back of the controller. If, like me, you want to keep your fingers on them for easy access, you’ll find that you have to adopt a completely different grip on the controller. Instead of wrapping your fingers around the handles, you’ll basically be palming the sides so that your middle and ring fingers can reach the paddles. Although odd, especially since it completely defeats the purpose of having rubber grips on the back of the handles, I didn’t find it to be especially uncomfortable. Still, the longer I used the controller, the more my fingers naturally started to wrap themselves back around the handles, making the paddles much less convenient to use. With a normal grip, my middle fingers could still reach over and hit the paddles, but it’s a noticeably less convenient approach and just a really odd decision in my opinion. As with the face buttons, though, whether or not you like one approach over the other is entirely personal.

Other considerations

The last real difference is that the Ultimate has buttons for remapping, switching profiles, and for controlling your headset. There’s nothing particularly remarkable about these except for the volume button. I have primarily been using these with PC and with the Tournament, volume is controlled by the PC like with any other speakers. With the Ultimate, the Windows volume control does absolutely nothing. Volume is controlled on the controller. You can either press the volume button to select one of four or five preset volumes (which seem to be too quiet, too loud, way too loud, and deafening) or you can hold it and use up and down on the d-pad to adjust the volume in smaller steps. I like this approach, but I wish the smaller steps were even smaller for more subtle volume changes. When playing on Xbox, you can also hold the volume button and use left and right on the d-pad to adjust the balance between game and chat audio, though I have not experimented with this.

On the software front, both use Razer Wolverine for Xbox. I won’t go into great detail about the software as it is mostly utilitarian, but, despite the name, it does work on both Xbox and PC. Most of the reviews I’ve read, especially on Amazon, complain that there is no PC software, but there is; it’s just not done through Synapse like every other Razer product. You have to find it in the Windows Store, but the advantage of being a universal program is that it syncs your profiles across platforms. I’m not sure if that’s because it stores them all on the controller or because it takes advantage of Microsoft server magic, but either way, all my profiles show up everywhere. It’s quite nice. However, the main reason I bring up the software is that in a reveal video for the Ultimate, a Razer rep mentioned that you could remap all the buttons on the controller. For example, say you wanted to swap A and B (and X and Y) so that you could hook the controller up to your Switch (with an adapter) and play Nintendo games without having to reconfigure your brain for the Nintendo layout. Maybe this is possible using the remapping function on the controller itself, but it is not available in the software. That would have been a big difference between the Tournament and the Ultimate, but as it is, it seems that the software functions pretty much identically for both.

Conclusions

I said that I wouldn’t make this a “which one should you buy” post, so… I won’t. I haven’t been able to make up my mind which one I like best, so it wouldn’t make much sense for me to tell you which one to get. What I’d really like, though, is for Razer to combine the best from both and put out a new Wolverine Ultimate Tournament Edition controller.

Audio basics for streamers part 3: levels, filters, and effects

Last time we wrapped up our look at the hardware components; in this post, we’re going to wrap up by looking at what you can do in OBS (and probably other software) to enhance that signal with some finishing touches. First things first, let’s talk about levels, which means that we actually need to step back into the hardware realm for a bit.

Input levels

Remember when I said that preamps are used to boost a mic level signal to line level? Well, there’s a reason why there’s a knob to control how much you boost it. If you just crank it all the way, you’ll be overloading the preamp and distorting the signal. Similarly, if you don’t boost it enough, then it’s going to be hard to hear and your signal-to-noise ratio (the difference between your input signal and the noise floor of the preamp) will not be very good. What’s the sweet spot? Well, it’s pretty simple to find, really. Turn up the gain on your preamp while speaking the loudest you might possibly speak/yell/whatever. Many interfaces have a clipping indicator on them; typically, red indicates that your signal is too loud. Once you hit the red, turn the gain back down until you stop hitting the red. Easy peasey, right?

The only catch is that you might find that your normal speaking voice is significantly quieter than your loudest possible sound and that, actually, you almost never get that loud in the first place. In that case, it might actually be better to turn the gain up a bit so that your normal speaking is more audible. Yes, if you happen to get super loud you might distort a bit, but in the grand scheme of things, that’s not that big of a deal. It’s better to have a good signal level with some clipping than no clipping and low signal level.

Filters and effects

Here’s where the fun really begins. OBS comes with several useful plugins, but I would also suggest downloading the excellent ReaPlugs from Cockos: https://www.reaper.fm/reaplugs/. These come with their recording software Reaper, but are also available for free for use with other software. You don’t need all of them; when you install them, I recommend ReaComp, ReaXcomp, ReaEQ, ReaFIR, and ReaGate. I’ll talk about what each of these do in a minute, but for now, it’s enough to know that the plugins serve a couple of purposes: reducing dynamic range, expanding dynamic range, noise reduction, and equalization. In OBS, you can find the filters by clicking the gear/cog icon next to the audio source you want to apply filters to in the mixer and choosing “Filters” from the menu. From there, use the + button to add a filter. ReaPlugs are added by choosing the VST option from that menu.

Noise reduction/suppression

Noise reduction should always be the first thing in your signal chain. OBS comes with both an expander and a noise gate, though the gate is technically just an expander with a high ratio. ReaGate does the same thing, but offers a few more options. Essentially, you specify a signal level that you want to be the minimum level and anything below that will be reduced (with an expander) or cut completely (with a gate). This also means that if you don’t talk above that threshold, you won’t be heard, either. For that reason, it’s best to cut noise at the source (turn off your A/C, close the windows, etc), but the noise gate is still a useful tool to get rid of the last bit of noise.

With an expander, you can make the cutoff a little more subtle since the audio is only reduced instead of cut. The ratio determines how much the sound is reduced. With ReaGate, you can also blend in some of the dry sound (that is, unaffected sound) and use the lowpass and highpass filters to control what frequencies actually trigger the gate.

With expanders and gates, I find that the default settings for the gate in OBS work quite well. The only thing you really need to adjust is the threshold as the cutoff point is going to depend on your gear and your voice.

OBS also comes with a noise suppression plugin, but I do not recommend using it. It’s designed to monitor the incoming audio for noise and filter out just that noise. In theory, this sounds much better than a noise gate; in practice, it also has a big impact on the sound of your voice and usually causes a noticeable degradation of quality. This is where ReaFIR comes in. It’s a pretty complex plugin that can do a lot of different things, but for our purposes, it’s an extremely effective and transparent noise suppressor. Change the mode to “Subtract,” then click the “Automatically build noise profile” checkbox. You want to be completely silent at this point so that it is only detecting the noise you want to filter out. You’ll see a red line come appear and, at some point, settle in. Once it stops moving (probably after a few seconds), uncheck the box. That’s it! This isn’t foolproof and is really only effective for things like A/C noise, fan noise, or other rumbles and white noises, but I find that I can use just this without any gating and get very clean audio.

Reducing dynamic range (compression)

Compression is usually the next plugin I will add (though you could put EQ first, the difference is subjective). In OBS, there are two plugins that accomplish this: “Compressor” and “Limiter.” ReaPlugs provides several types with the ReaComp, ReaXcomp, and ReaFIR plugins, though we will not be using ReaFIR for that. Compressors serve the opposite purpose of an expander: they reduce the volume of anything over a certain threshold you set. The amount that the signal is reduced is controlled by the ratio, just like with the expander. Typically, a 3:1 ratio is pretty good for speaking. The general idea here is to figure out the volume of your quietest speaking voice and set the threshold just above that. This way, your louder speaking will be reduced in volume to better match your quieter speaking volume. As you might imagine, this reduces the overall volume of the signal, so you can raise it back up using the output gain slider.

Unfortunately, there are no meters within the plugin, so you have to look at the meters on the mixer to determine your approximate levels. This is where ReaComp and ReaXcomp come in. You can easily see your volume levels and set the threshold right on the meter. You may want to experiment to find the exact settings that work for you, but I find a relative quick attack (2-4 ms) and release (10-20 ms) work pretty well. You may also want a bit softer knee for a more subtle effect. I’ve found that a 3 dB knee is pretty good. Tweak the threshold until your levels are pretty consistent, then adjust your output levels to compensate for the decrease in volume. You can try checking the “Auto make-up” box, but, if that doesn’t work, simply increase the “Wet” slider until you get a good output level without clipping. This article provides some good additional reading if you want a little more detail on the settings, but keep in mind that all of these recommendations are just starting points.

If ReaXcomp confuses you, don’t worry about it too much. It is a multiband compressor, meaning that it can compress different ranges of frequencies differently. It’s a more advanced version of compression that I don’t recommend messing with for now, but you might want to play around with it later and might even end up liking it.

Limiters, much like gates, are just extreme compressors. Any compressor with a ratio of 10:1 or more is considered to be a limiter. They are useful for setting an absolute maximum signal level to prevent clipping. You might, for example, put a limiter as the last thing in your signal chain with a threshold of -1 dB just to make sure you can’t clip the output.

Equalization

This is probably the filter most familiar to you, at least in theory. It allows you to raise or lower the bass, mids, and treble of your signal. It’s extremely useful, but, unfortunately, not included with OBS. Instead, you will need to use ReaEQ. This is going to look a little bit more complicated than what’s on your radio, but here’s the gist of it. Each of the tabs is a point that you can adjust. You can have as many or as few as you want. By default, the first one is a low shelf and the last one is a high shelf. The other bands in between will be set to band. A shelf filter basically takes everything below or above a frequency point and increases or lowers it, hence the shelf moniker. A band filter, meanwhile, adjusts a range of frequencies up or down. The range is determined by the bandwidth or Q. You can make it control a very wide range of frequencies or a very small range. In general, wider ranges will sound more natural and narrow ranges will sound more artificial. However, narrow ranges can be useful for filtering out very specific problem frequencies.

In general, you don’t want to make huge changes here. You can boost a bit around the 100 Hz range to increase the low end of your voice or boost with a high shelf around 4.5 kHz and up add more presence/crispness. You might also reduce frequencies around the 200 Hz range or a little above to reduce muddiness. The exact settings are going to depend on your voice, your mic, and your recording environment. For me, a little cut around 3 kHz (to make me sound less nasal) and a high shelf boost around 4.5 kHz works quite well, but you’ll need to find the settings that work for your mic and voice.

Output levels

Now that your voice is sounding good, it’s time to look at the meters and make sure you aren’t blowing out your viewer’s eardrums. If you look at the mixer, you’ll see that 0 dB is at the right (or top in vertical layout). From there, there’s a red zone, a yellow zone, and a green zone. The colors are a little misleading, honestly, but the general idea is to stay out of the red zone so that your overall level doesn’t distort. Maybe one day they will add an overall output meter to give us a better idea what the output really looks like. Until then, here’s how I set it up.

Leave the fader for your voice track at the maximum position. I also recommend going to the advanced audio properties and clicking the “Downmix to mono” for that track, especially if you are using an audio interface, just to make sure your voice is coming out of both speakers. That’s not strictly necessary, but if you see two meters for the track and only one is moving, you’ll definitely want to downmix. While you are adjusting your filters, you want the final signal level to live in the middle to upper range of the yellow portion of the meter. It’s okay if it hits the red on occasion, but you never want it to hit the 0 dB line. You’ll now have a good maximum volume for your voice track. Since that should be the loudest thing in your stream anyway, you can just leave that slider alone.

From there, adjust your other volumes down until you find a sweet spot where they are still audible but not so loud that they drown out your voice. The OBS wiki mentions that you’ll want these non-voice tracks to be somewhere in the green range of the meter, but you’ll probably need to do a few test recordings to find the sweet spot.

One last note on the mixer. In part 2, I said we’d talk about why you need to think of your inputs as working in pairs and only put mics into every other input. The reason is that OBS does not support ASIO, instead relying on standard Windows audio for inputs and outputs. ASIO allows every input to be a unique input, but Windows, for whatever reason, reads them in stereo pairs. This means that, for a 4-input interface, OBS will see it as two stereo inputs where input 1 is left, input 2 right, input 3 left, and input 4 right. If you want to put different effects on the inputs, this effectively halves the number of inputs you can use. I haven’t tried it, but there is a plugin that adds ASIO support: https://github.com/pkviet/obs-asio. From what I can tell, it looks like this will allow each input to be used separately, so if that’s something you need, give that a try.

Final final thoughts

And that’s really all there is too it! I know this was a lot of information and I probably still missed some things, but I hope this clears up most of the mystery. I didn’t go super in-depth with compressors and gates, but honestly, the default OBS settings (aside from the threshold) are pretty good, so you don’t really need to mess with them too much. If you want to understand them better, there are a lot of good explanations on the web that should help with that. But if you have any questions, let me know!

Audio basics for streamers part 2: preamps, mixers, and interfaces

Last time, we took a look at the different types of microphones and some specific models you might use. We’re going to gloss over cables (because you should always get a quality one) and skip to the next part of the signal chain: preamps, mixers, and interfaces. I’m grouping these all together because a lot of people get them confused and because they are actually somewhat related. Let’s dive in.

Preamps

There are three basic signal levels in the audio world: mic, instrument, and line. Line level is the standard, so the goal of a preamplifier is to increase a mic or instrument level signal to line level. It’s a pretty simple objective, but the quality can vary wildly from one to the next. For example, your computer’s sound card, as long as it has a mic input, has a preamp, but it may be noisy or generally not sound very good. Most audio interfaces these days have decent preamps in them, so that can be a nice upgrade if your computer’s sound card isn’t very good. And you can also buy standalone preamps like the UA Solo 610 I have if you really want an improvement (though that would be extreme overkill for streaming).

Long story short, preamps are necessary, but you don’t really need to think about them as separate from other pieces of gear you need to use with your mic. It’s just helpful to know what they do so you can troubleshoot your signal quality later.

Mixers

One of the biggest misconceptions people have when they are just starting out is that they need a mixer. They saw a picture of a studio somewhere with a big mixer and though, “Wow, I need that!” The thing is, you don’t. Before computer recording was a thing, albums were mixed on enormous analog studio consoles, but these days, most of those are just control surfaces that move digital faders in a computer. They don’t actually process any sound. Similarly, the only real reason to use a mixer these days is for mixing a live show – a concert, for example. With streaming, mixing is done in the computer. If you mix everything with an external mixer before it gets to your computer, you actually end up losing functionality because everything is on a single audio track. You can no longer apply filters to individual elements or split them to multiple tracks in your video file.

The one potential use of a mixer is to take several external analog sources, like retro game consoles, and condense them down to a single output. A lot of old consoles output at different volumes, so this would allow you to balance them to get consistent levels from one console to the next. Of course, if you’re converting their signals to digital anyway, then there’s not much reason to do this, especially since you could just set up different scenes in OBS for the different volume levels. Basically what I am saying is don’t buy a mixer. You don’t need it.

Audio interfaces

Think of an audio interface as a fancy sound card because, well, it is. We just like to use fancy words to distinguish professional audio gear from regular PC components. The core function of an audio interface is to take your analog audio signal and convert it to a digital one (and vice versa). This is where the term AD/DA converter comes from: analog to digital/digital to analog. Most will also have a preamp built in so that you can record your mic or instrument. These days, there aren’t many “bad” choices for audio interfaces, but you may find that some fit your needs better than others. You’ll generally want to find one with low noise and low latency. If you might also use it for recording music, then sure, invest in a better quality one. But for streaming, where you are just talking, the quality differences are going to be negligible.

The one thing to keep in mind with interfaces is that generally the inputs come in pairs. In recording software, you can record each input to its own track, but in OBS, these are typically seen as stereo pairs. So, for example, if I have an interface with two inputs, OBS will see these as a single input with input 1 being the left channel and input 2 being the right channel. So if you need to capture multiple mics, you may want an interface that has two inputs per microphone (with the mics plugged into every other input) so that you can apply different filters and effects to each mic. We’ll talk more about why that happens when we get to the software side of things.

Sound cards

I’m mentioning these separately because I talked in part 1 about using your computer’s 3.5 mm input for headset and shotgun mics. Despite the fact that I have significantly nicer options for getting audio into my computer, that’s what I’m doing now. Shotgun mic with a 3.5 mm cable into my computer. Nothing fancy about it. Your mileage may vary here, but in my case, my motherboard came with a pretty nice sound card that isn’t very noisy and sounds halfway decent. If you are also going with a headset or shotgun mic, that may be all you need. There are also aftermarket sound cards you can buy (including USB ones) that may offer improvements over your built-in card.

However, if you’re using a mic with an XLR jack (which is most other non-USB mics), you’ll want to get an audio interface instead.

Final thoughts

Ultimately, you will need to consider your entire signal chain (not just your mic) when getting set up for streaming. For example, if you buy a USB mic (like the Yeti), you’ve already got a preamp and an audio interface built into the mic. If you buy a headset mic or a camera-mount shotgun mic, you might be fine with just using your computer’s sound card. If you get an SM7B even though I said not to (it’s okay, I understand), you’ll want to make sure to get an audio interface with lots of gain available. And if you get an XLR condenser mic (you really don’t listen, huh?), your interface will need phantom power, too.

Now that you’ve got signal going into your computer, what do you do with it? Next time, we’ll look at filters and effects to really maximize your sound quality. And I guess we’ll also touch on figuring out the proper levels so you can be heard without distorting.

Part 3: levels, filters, and effects

Audio basics for streamers part 1: microphones

It seems like every day there is a Reddit post asking for advice on fixing an audio problem. What mic should I use? What mixer? How do I get rid of background noise? But most of the advice I see offered is… well, let’s just say it means well. Usually, someone suggests spending a lot of money on something the person doesn’t actually need and probably won’t actually help them. I thought I’d spend some time putting together a guide on every part of signal chain from mics to interfaces and mixers to post processing.

First, a little detour for some background info on me that will, hopefully, explain why I am qualified to provide advice. My degree is in film and TV with a minor in audio recording. I spent some time working in TV after college, joined a few bands, recorded two albums (and mixed one of them), and am currently recording and mixing a third. I also worked at a shop selling pro audio gear for 5 years. This is not to say that I am an expert; I’m not. It’s just to say that I have a fair amount of experience, certainly more than the average streamer, and that I was an audio guy long before I was a streamer. I’ve used some really nice equipment and some really not-so-nice equipment. I own a bit of both and a lot of the stuff in between. I will make some recommendations based on my experience and opinions, but ultimately this guide is about finding the right gear for you.

On to business. The first and arguably most important part of your signal chain (well, other than your voice) is your microphone. Every microphone has a different sound and set of features that might make it more or less suitable for a given voice and a given application. There is no one perfect choice for every person. But if we take a look at the differences between them, we can find one that is a likely candidate for your needs. First, some info on the differences between the two basic types of mics you’ll be looking at, then I’ll dive into some specific mics and why you may or may not want to use them.

Dynamic vs condenser mics

The two main categories of microphone are dynamic and condenser mics (there are others, but you aren’t likely to be using those). Dynamic mics are the simplest types of microphone in terms of their construction. They function more or less like a speaker in reverse. The diaphragm has a magnet attached to it that moves through a coil of wire to turn the physical air movement into an equivalent electrical current. Condenser mics, meanwhile, are typically use thinner diaphragms, require external power, and come in a wide variety of polar patterns (the directionality of the mic) and sizes to fit just about any application.

When it comes to choosing one for your stream, there are a couple general characteristics to keep in mind. The benefits of a dynamic mic are that they do not require external power, can usually handle very high volume levels (maybe not so critical for streaming), tend to be very durable, and don’t pick up background sound very well since they are not very sensitive. That makes them generally better suited for streaming than condensers. On the downside, because they are not very sensitive, you will usually need to be very close to the mic to be heard. This also means that if you move your head, the volume can drop dramatically.

Condenser mics, on the other hand, are very sensitive. This allows them to pick up more details and high frequency information, so they typically sound “better” than dynamics (better is subjective, of course), but they will also pick up more background noise. Cheaper ones may also have issues (ie distort) with louder sounds. They also require power to function. On the plus side, there are a lot of different types of condenser mic that may suit your needs better than a dynamic.

Now that we have a grasp on the basics, let’s examine some of the popular mic choices as well as some you may not have considered.

Blue Yeti

This mic became the defacto standard for streamers because it’s affordable, sounds good, and is easy to setup and use. There are now three main variations of it: Yeti, Yeti Pro, and Yeti Nano. The two bigger Yetis have several selectable polar patters, though you’d generally only want to use the cardioid pattern for streaming. The thing is, despite their popularity, they really aren’t a very good choice for streaming. They’re not very directional and, being condensers, they are very sensitive, so you are going to pick up lots of room noise, including your air conditioner, keyboard, dog barking, etc. You’ll also need to get a pop filter so you don’t blow people’s ears out every time you make a “p” sound. For the same price or less, there are several other options that will do a better job. Having said that, if you have a quiet space, quiet keyboard/controller, shockmount, stand or boom arm, and pop filter, you can absolutely get great results with these.

Headset mics

These are typically condenser mics (though dynamic options exist) and may be included with a gaming headset or purchased separately. While the mics on gaming headsets are generally not a good option, add-ons like the Antlion ModMic series can be a really great choice. Since they are worn on your head, the mic is always positioned in the same spot relative to your mouth, so volume levels will be very consistent. They are also just generally very convenient since you don’t need a stand and they plug into the 3.5 mm input on your computer (or USB in some cases). Your results may vary depending on the quality of your computer’s sound card, but generally a quality headset mic is a great option. Just make sure to find a directional (cardioid) one to cut down on background noise.

Shure SM7B and EV RE20/RE320

It’s not hard to see the appeal of these mics. They are broadcast dynamic microphones found in radio studios everywhere, so they seem like a natural fit for streaming. However, they have a number of downsides that might make them a bad choice for you. First, they are extremely low output microphones, so you will need a good quality preamp to amplify them. Most $100 audio interfaces will be good enough, but you may need to purchase an additional add-on like the Cloudlifter to boost the signal depending on your setup. Second, you will need to put your mouth practically on the microphone to be heard. On the plus side, that means that they pick up almost no background noise; on the downside, moving your head even a little can cause a dramatic volume drop. They are also huge, so if you’re hoping to hide your mic, look elsewhere. I’ve seen these mics used to great effect on stream, but I’ve also noticed that the streamers using them are right on top of the mic and move very, very little. If that doesn’t sound like a problem to you and you are okay with making a few tweaks with filters to get a better sound, these can be great options, especially if you really need to minimize background sound. Just keep in mind you are looking at $400+ to get everything you need to make this work.

Other dynamic mics

If the broadcast mics are a little rich for your blood, you can get similar results for a lot less with something like a Shure SM58. Handheld vocal mics are designed for stage use, so they are generally more directional and, naturally, tuned for human voice. Different mics will have different qualities, though. The SM58 is another mic that requires you to be right up on it for good sound, but Sennheiser’s e835, for example, works fine with a little more breathing room. Aside from typically louder output than the broadcast mics, though, most of the same pros and cons apply.

Shotgun/boom mics

Now here’s a category I don’t think I’ve seen any streamer talk about even though shotgun mics are purpose built for recording on-screen talent. That makes them a perfect fit for streaming. They are very directional, so they pick up very little background sound, and can be hidden off camera without reducing quality. In fact, I use one in my living room setup. Even with the surround sound going and no noise gate in use, all that comes through is my voice. If you look for mics designed to be mounted to a camera, you’ll also be able to connect directly to your computer’s 3.5 mm input so you don’t need to buy a separate interface. My personal choice is the Deity D3 or D3 Pro. These cost about the same or less than other mics on this list. The only downside is that it’s possible you might pick up your keyboard if your face tends to hover over it (as the mic should be pointed at your mouth from above), but as long as you lean back, you should get great results. Just make sure you put the mic about 6-8″ from your mouth, more or less above and in front of you, to get the best results.

Hopefully this gives you some ideas about what to look for in a mic. Any of these options can work, but it really comes down to what works for your voice, your setup, and your budget. Next time, we’ll look at the next part of your signal chain: preamps, mixers, and audio interfaces. Then we can dive into the software side of things!

Part 2: preamps, mixers, and interfaces