It has been several years since I wrote my audio basics posts and published a series of videos on the subject and while they still have a lot of good information, I have also learned some things since then. Nothing that fundamentally changes anything I said previously, mind you; that’s all still good information. These are just some little tips and tricks I’ve picked up along the way that I thought I would share.
Mic choice matters
But probably not as much as you’ve been led to believe. You’ve probably heard, even from many intelligent audio producers, that dynamic mics are less sensitive than condenser mics (which is true) and that means they are better at background noise rejection. They are not. If you take two mics with vastly different sensitivities and match their output level, all sounds entering the front of the mic will have exactly the same output level. Sensitivity is not magic, it only measures the output voltage of the mic when presented with a given input level.
Notice I said the front of the mic, though. That’s because the relevant factor here is not the sensitivity but rather the polar pattern. Just because a mic is cardioid does not mean that it is the same as other cardioid mics. Cardioid is a very broad category, so let’s look at two examples.
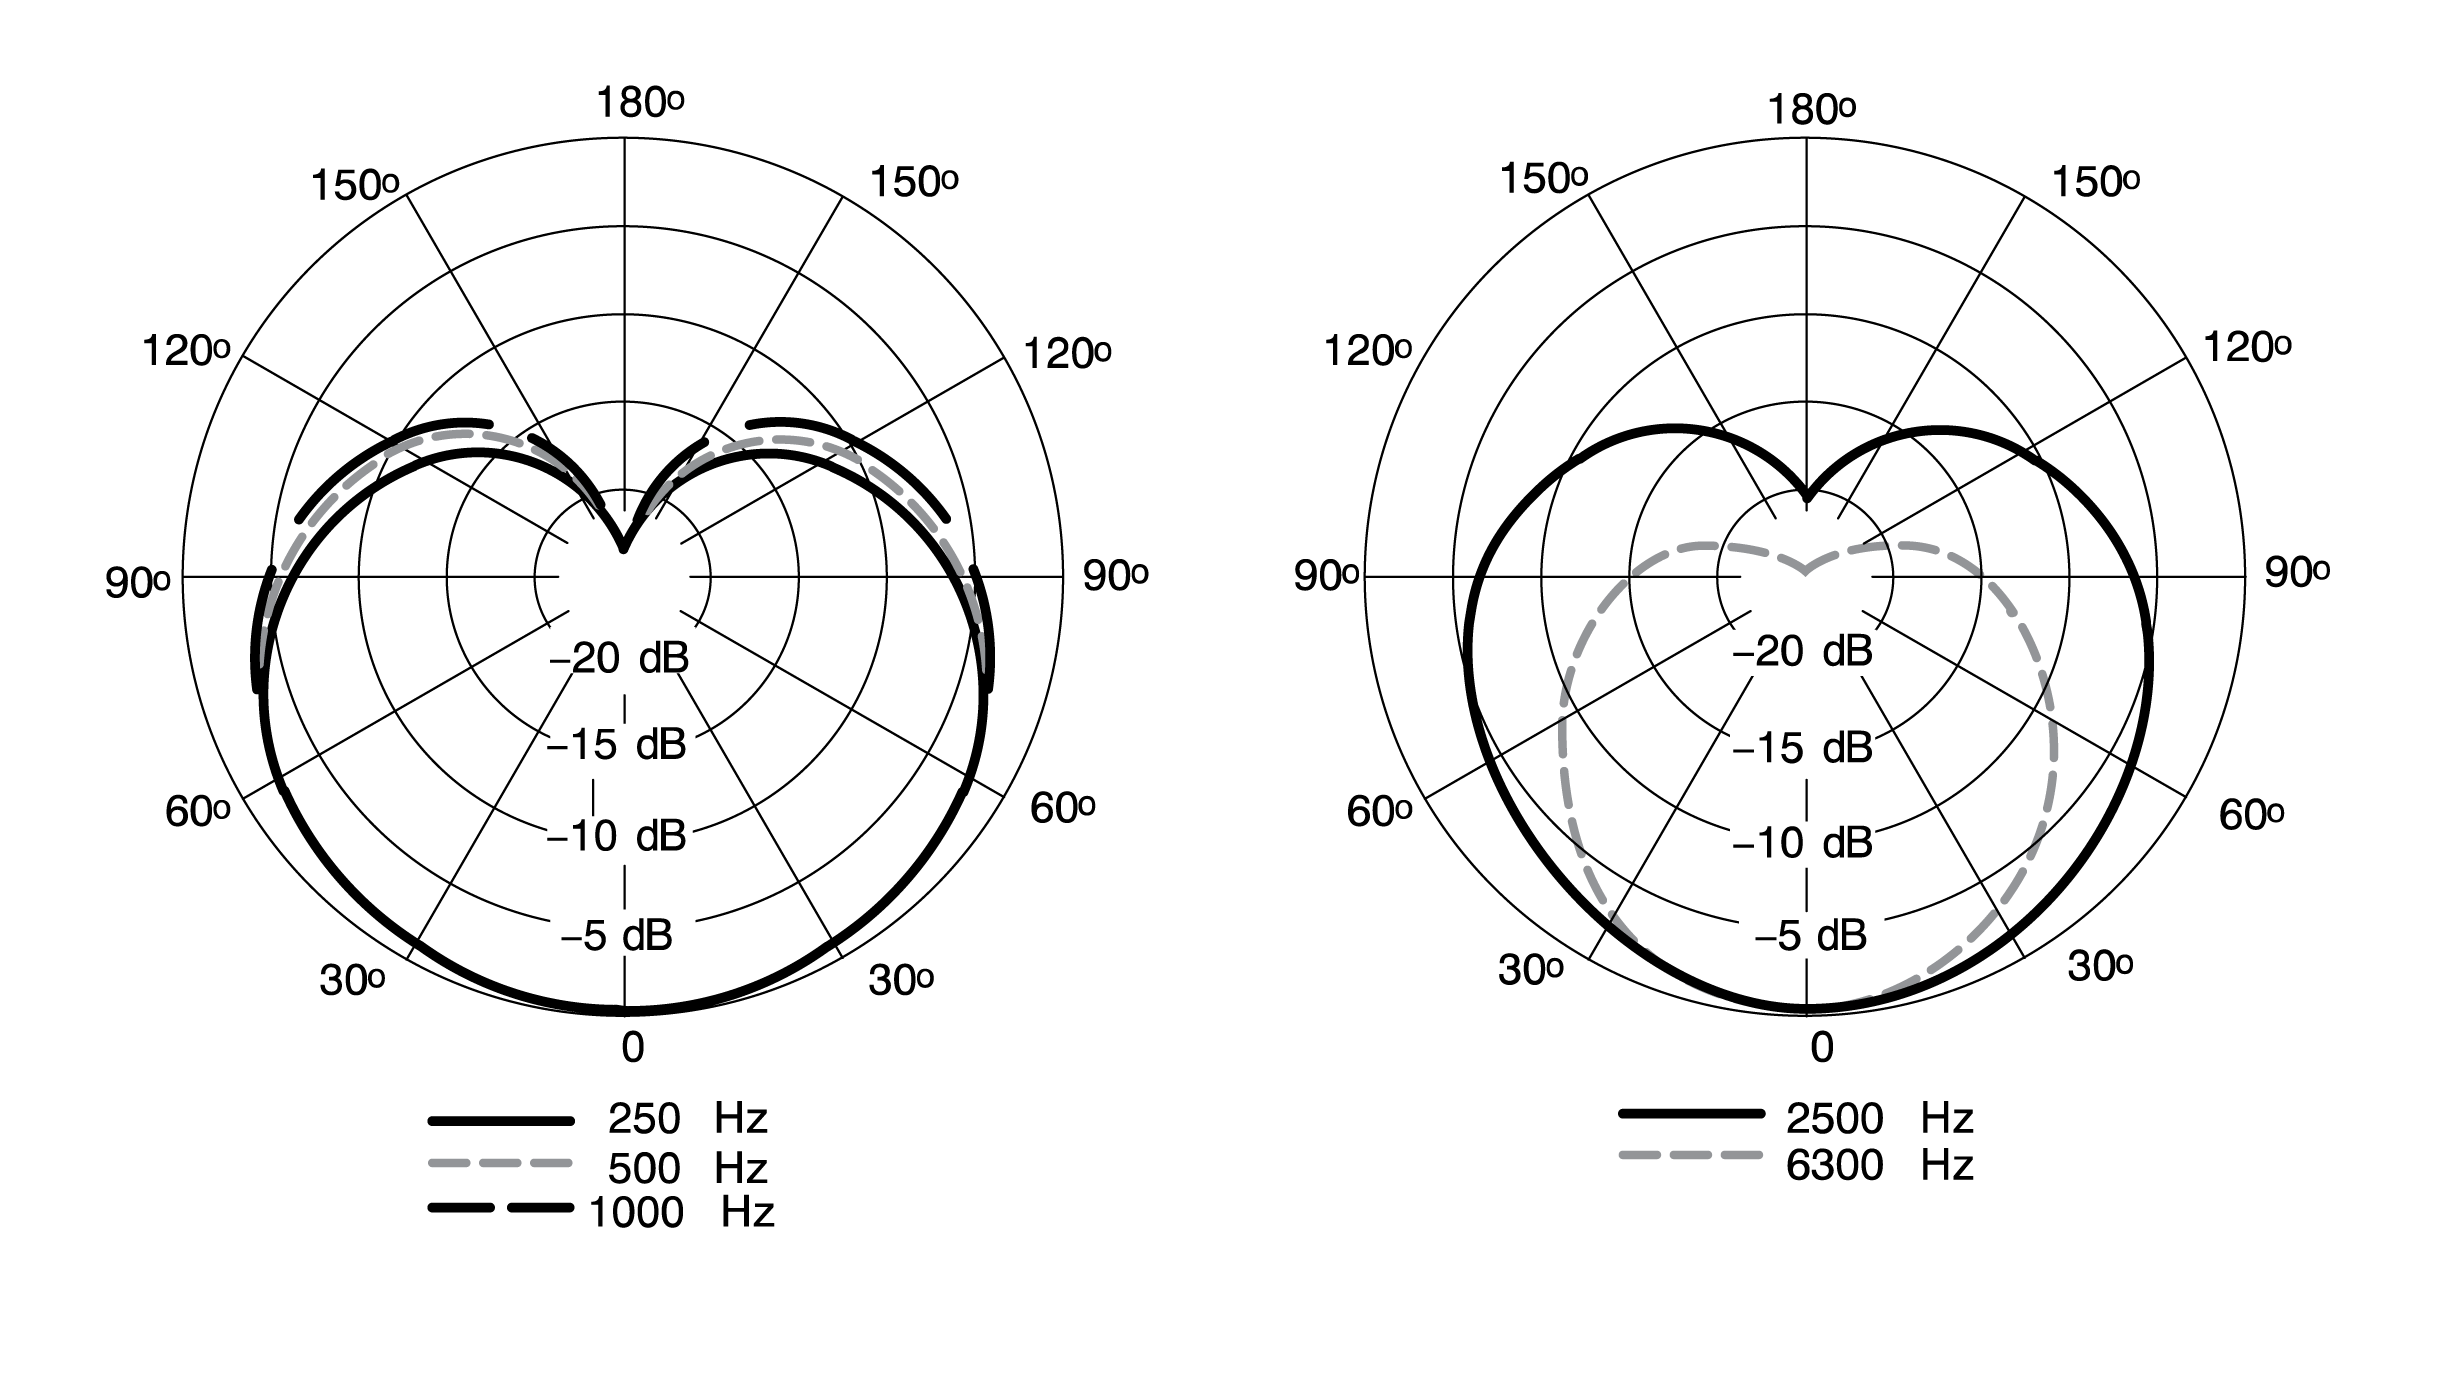
Here is the polar pattern graph for the SM7B. If the image doesn’t load for some reason, it was taken from the official user guide, available here. This is a cardioid polar pattern (that refers to the heart shape), but you’ll notice that as the frequency increases, the polar pattern tightens. That is, the mic becomes increasingly directional at higher frequencies. This is useful because room reflections tend to occur mostly in the higher frequencies, so this suggests that it is good at rejecting those reflections that enter the mic from the side.
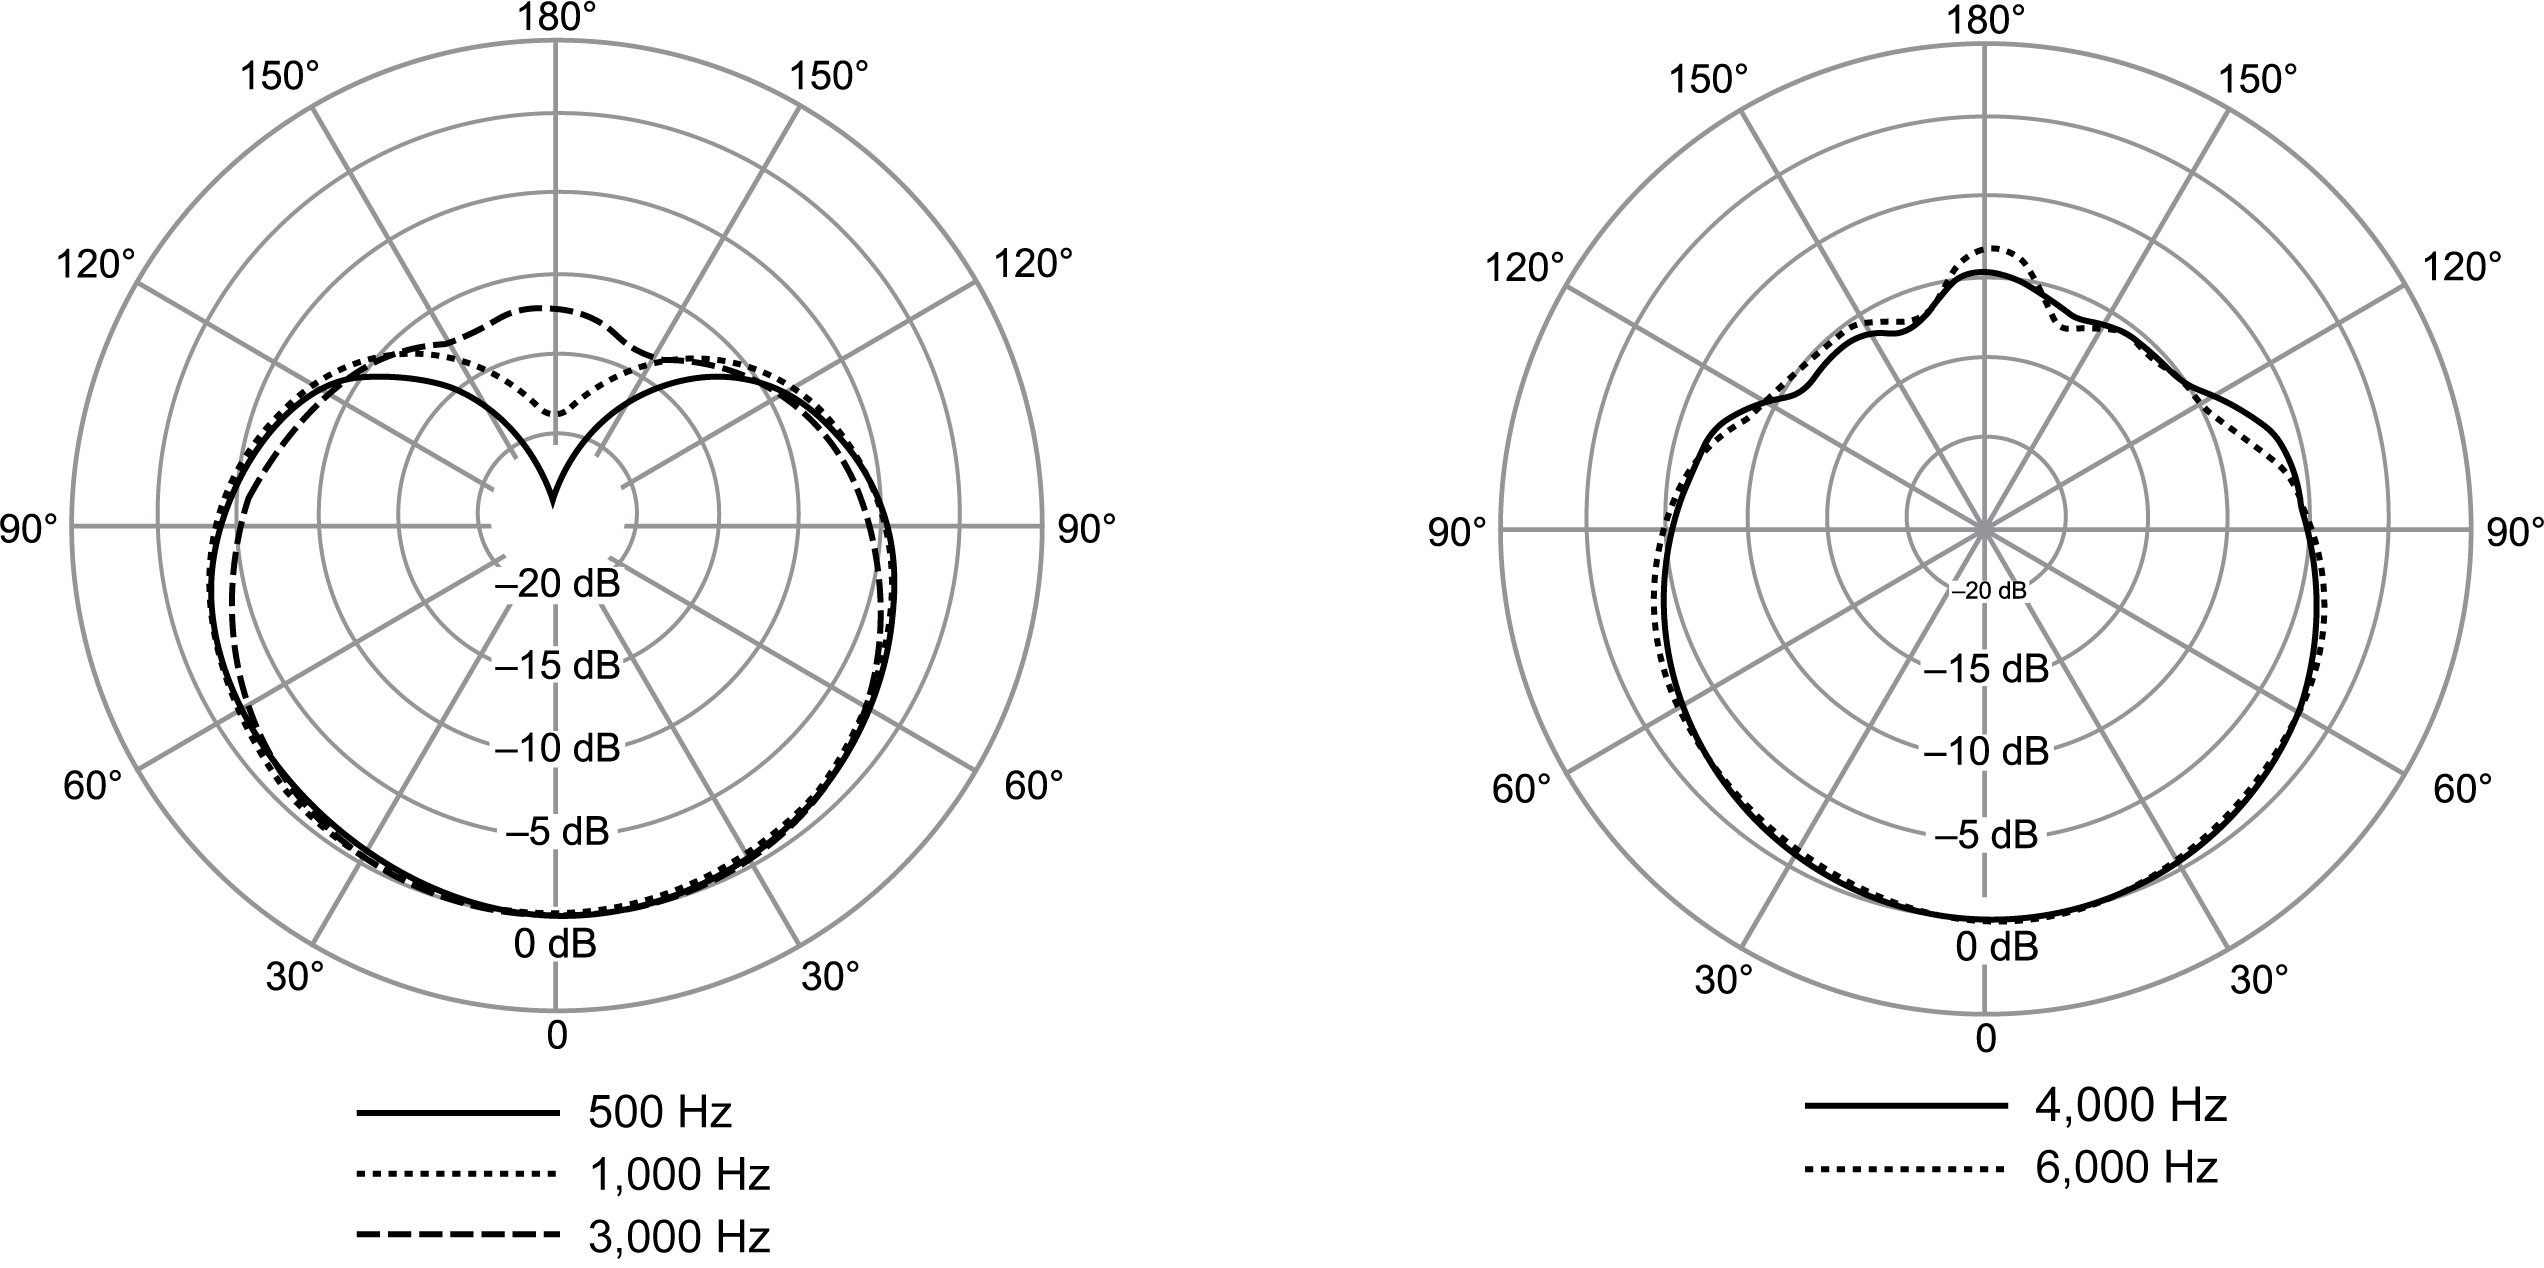
This is the polar pattern graph for the Shure MV7+, also helpfully taken from Shure’s web site (thank you, Shure, for having useful and convenient specs). Unlike the SM7B, you’ll notice that the polar pattern does not narrow at higher frequencies. You’ll also notice that, like many other cardioid mics, it picks up a bit of sound behind the mic. This means that not only will it pick up more reflections from the sides but also from the rear. This is especially problematic if you position the mic in front of your monitor as it will pick up the reflections of your voice bouncing off your monitor.
Now, does this mean you should go out and buy an SM7B? Probably not. It just means that you may have more work to do when battling room reflections and that you will need to be cognizant of the polar pattern when positioning your mic. For example, don’t put the MV7+ directly in front of your monitor or have the back aimed at your keyboard if you don’t want people hearing that. You will also want to consider how the polar pattern interacts with any acoustic treatment in your room (or lack thereof).
Mic positioning matters
And not just regarding the polar pattern, as mentioned above. Mic position is something you will need to experiment to figure out what works best for you. One of the reasons people believe the SM7B magically removes background noise isn’t because it does but instead because it enforces good mic technique. It is designed in such a way that people want to be close to it. Not only that, but because it’s now a status symbol, people want to show it off, so they aren’t trying to hide it off camera. But you can do the same thing with any mic! Put it close to your mouth, 2-3″ away, and you’ll find that those room reflections start disappearing. This is because your voice is now significantly louder than those background sounds. The closer the mic is to your mouth, the better this signal-to-noise ratio (SNR) will be. Don’t be afraid to have your mic on camera!
The downside of bringing the mic that close is that it might get in your way and plosives might be more of a problem. In that case, experiment with moving the mic off to the side or down below your mouth (or both). Make sure you record some tests! As you move the mic around, you’ll find that the resulting tone changes. You may like the changes or you may not, so find a good position that balances SNR, tone, and plosive rejection.
Interface selection
There are honestly only a couple of things that really matter when it comes to an audio interface:
- Are the preamps flat/neutral?
- Do the preamps have a low noise floor?
- Are the drivers reliable?
- Is the headphone amp flat/neutral?
- Does the headphone amp have a low noise floor?
- What software features are included?
Most of those things are technical specifications that are pretty easy to look up, just be aware that many companies have misleading specs that really don’t tell the whole picture. Check independent reviews, especially once with technical measurements, to be sure. However, the software features can be very relevant for streamers. I don’t care much for onboard signal processing (DSP) or for a software mixer utility that has that since all of that can just be done in OBS, but many interfaces include software mixers with additional virtual outputs that can completely negate the need for utilities like VoiceMeeter. Audient (depending on the interface) and Elgato both have these features, but they are not alone. This is handy because it means I don’t need any additional software, they aren’t adding much (if any) latency, and there’s no quality loss. I like to use these to route my alerts and stream music to outputs 3-4 so I can hear them and they go to the stream, but they don’t go to my recordings. You could also use them to route voice chat to a separate channel for mixing. If your interface doesn’t have a virtual mixer, you can still use VoiceMeeter, so don’t feel like you need to buy something new, but if you’re in the market for a new interface anyway, you might want to look for this feature.
Gain staging and levels generally
I said in my previous post on setting levels that you want to set your preamp gain such that your loudest possible sound doesn’t clip and that is still true. What this actually means for you will depend on how dynamic you tend to be. If your voice doesn’t vary much in volume, you can set the gain higher and your post-processing workflow will be a bit easier; if, like me, you are all over the place, you’ll have to set your gain lower and do more work to level it out later.
However, when you are checking your levels to make sure they don’t clip, there is an important quirk of OBS that you will need to know. I won’t get too technical here, but the short version is that when you downmix to mono (which you should), OBS will compensate by lowering the level by 6 dB. This is to account for the increase in level that would occur if the same signal was on both the left and right channels, but for most of us using a mono mic, there is no signal on the other channel. The end result is that the mic’s output level is 6 dB lower than it should be and will never appear to clip in OBS even when it is clipping at the mic preamp stage. So when you set up your mic in OBS, in the advanced audio properties, set the balance all the way left (assuming you are on the “left” input), check the mono checkbox, and then go to the filters and add a gain filter with a 6 dB boost. All other processing will happen after this boost. Now you will see correct levels in OBS and can accurately gauge whether or not you are clipping.
Compression: sometimes more is less
As I mentioned above, I have a very dynamic voice. Most of the time, my input level is around -20 dB (or lower), but if I get particularly excited, I will hit all the way up to -0.5 dB. As a result, maintaining a consistent output level without sounding overly compressed has been a bit of a challenge. If you find yourself in the same boat, let me introduce you to the concept of… just adding more compression. Sort of. Sometimes.
One way to deal with the problem is to just crank up your compressor, but this tends to result in an unnatural sound that affects the entire signal. You may also find that no matter how much compression you add, you really can’t tame those extreme peaks. The solution is to just use two compressors, one to tame the extreme peaks and the second for general compression (and technically a third that is a limiter, just in case). As with all things, the following settings are just guidelines; you will need to adjust them for your own situation.
The first compressor comes after the 6 dB boost, noise gate, and EQ, and is intended to tame the highest peaks. In my case, I set the threshold to -17 dB, the ratio to an aggressive 10:1, and the attack as fast as it will get (0.005 ms for the compressor I’m using). There is no makeup gain on this compressor. The threshold was set so that my normal speaking does not hit this compressor at all, only the parts where I am yelling are affected. Having a fast attack means that the spikes from hard consonants can’t get through and the 10:1 ratio means that these very loud sections get squashed down to be more in line with my average signal level.
Now that the extreme peaks are tamed, I run the signal through a second, far milder compressor. This one is set with a -36 dB threshold so that nearly everything is affected, a mild 3:1 ratio, and an attack of 8 ms to intentionally allow hard consonants to go through as that sounds more natural (this is a trick I only learned recently). I then boost the signal by 19 dB to bring it up to a reasonable listening level (in OBS, this is toward the upper end of the yellow meter segment).
Finally, the signal goes through a hard limiter set to a -1 dB limit so that if all of that compression is somehow not enough, the signal still cannot exceed -1 dB (the recommended ceiling for most digital content). This probably sounds like a lot of compression, but keep in mind that most of the time only the second compressor is engaged. The end result is a very even output level that still sounds fairly natural.
That’s it!
Hopefully these are some useful new tips for you. Like I said, nothing about the original posts or videos has changed, but I have found these to be helpful tips to consider as I navigate my own streaming journey.